
Python | Uploading images in Django
In django we can deal with the images with the help of model field which is ImageField.
The very first step is to add below code in the settings.py file.
MEDIA_ROOT is for server path to store files in the computer.
MEDIA_URL is the reference URL for browser to access the files over Http.
In the urls.py we should edit the configuration like this
if settings.DEBUG:
        urlpatterns += static(settings.MEDIA_URL,
                              document_root=settings.MEDIA_ROOT)
A sample models.py should be like this, in that we have created a Hotel model which consists of hotel name and its image.
In this project we are taking the hotel name and its image from the user for hotel booking website.
# models.py class Hotel(models.Model): name = models.CharField(max_length=50) hotel_Main_Img = models.ImageField(upload_to='images/') |
Here upload_to will specify, to which directory the images should reside, by default django creates the directory under media directory which will be automatically created when we upload an image. No need of explicit creation of media directory.
We have to create a forms.py file under image_app, here we are dealing with model form to make content easier to understand.
# forms.py from django import forms from .models import *class HotelForm(forms.ModelForm): class Meta: model = Hotel fields = ['name', 'hotel_Main_Img'] |
Django will implicitly handle the form verification’s with out declaring explicitly in the script, and it will create the analogous form fields in the page according to model fields we specified in the models.py file.
This is the advantage of model form.
Now create a templates directory under image_app in that we have to create a html file for uploading the images. HTML file should look like this.
<!DOCTYPE html> <html lang="en"> <head> <meta charset="UTF-8"> <title>Hotel_image</title> </head> <body> <form method = "post" enctype="multipart/form-data"> {% csrf_token %} {{ form.as_p }} <button type="submit">Upload</button> </form> </body> </html> |
When making a POST request, we have to encode the data that forms the body of the request in some way. So, we have to specify the encoding format in the form tag. multipart/form-data is significantly more complicated but it allows entire files to be included in the data.
The csrf_token is for protection against Cross Site Request Forgeries.
form.as_p simply wraps all the elements in HTML paragraph tags. The advantage is not having to write a loop in the template to explicitly add HTML to surround each title and field.
In the views.py under image_app in that we have to write a view for taking requests from user and gives back some html page.
from django.http import HttpResponse from django.shortcuts import render, redirect from .forms import *# Create your views here. def hotel_image_view(request): if request.method == 'POST': form = HotelForm(request.POST, request.FILES) if form.is_valid(): form.save() return redirect('success') else: form = HotelForm() return render(request, 'hotel_image_form.html', {'form' : form}) def success(request): return HttpResponse('successfuly uploaded') |
whenever the hotel_image_view hits and that request is POST, we are creating an instance of model form form = HotelForm(request.POST, request.FILES) image will be stored under request.FILES one. If it is valid save into the database and redirects to success url which indicates successful uploading of the image. If the method is not POST we are rendering with html template created.
urls.py will look like this –
from django.contrib import admin from django.urls import path from django.conf import settings from django.conf.urls.static import static from .views import *urlpatterns = [ path('image_upload', hotel_image_view, name = 'image_upload'), path('success', success, name = 'success'), ] if settings.DEBUG: urlpatterns += static(settings.MEDIA_URL, document_root=settings.MEDIA_ROOT) |
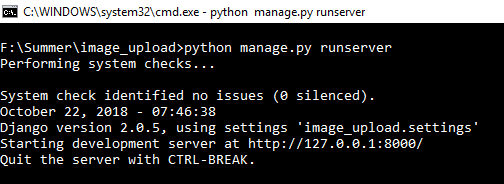
Now make the migrations and run the server.
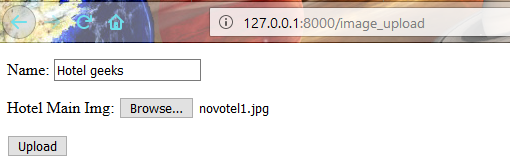
When we hit the URL in the browser, in this way it looks.
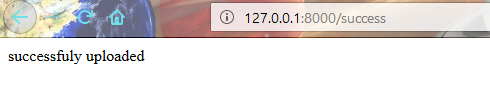
After uploading the image it will show success.
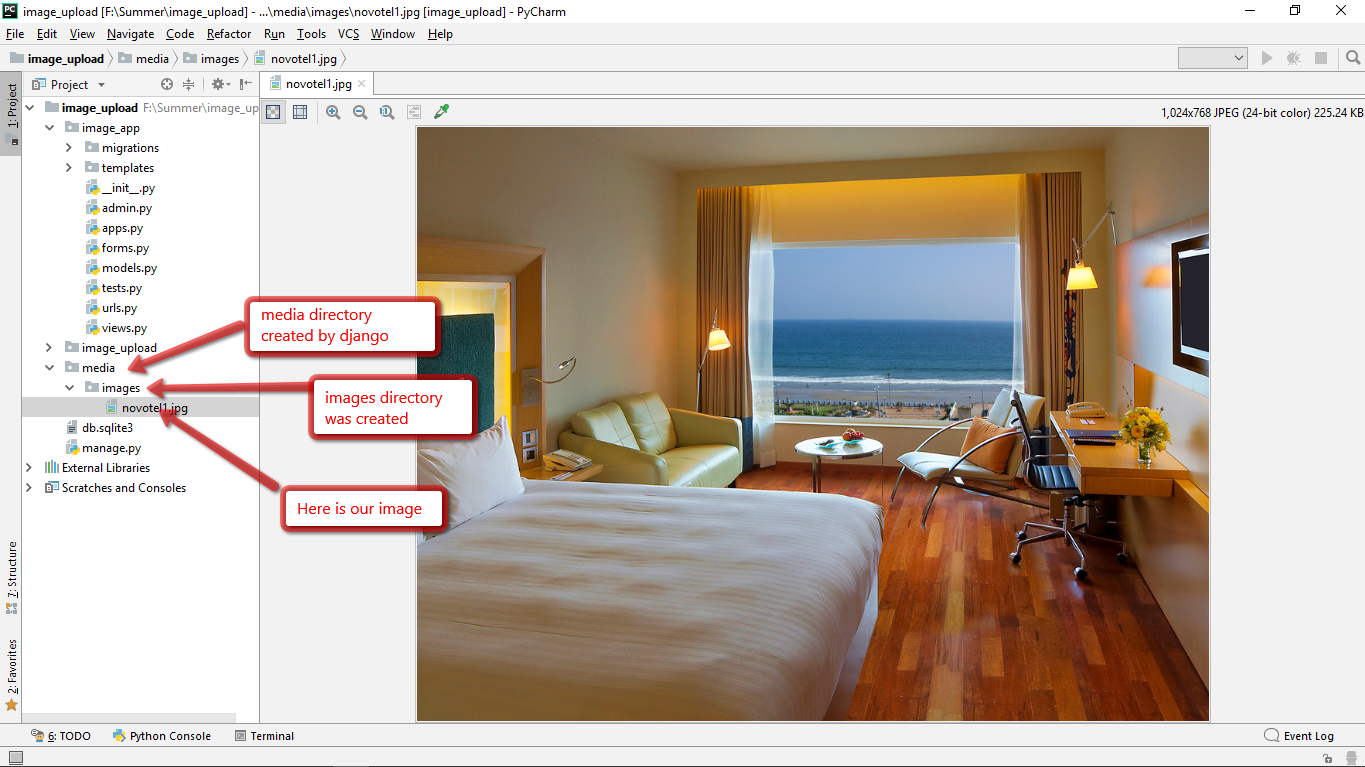
Now in the project directory media directory will be created, in that images directory will be created and the image will be stored under it. Here is the final result.
Final output stored in the database
Now we can write a view for accessing those images, for simplicity let’s take example with one image and it is also applicable for many images.
# Python program to view # for displaying images def display_hotel_images(request): if request.method == 'GET': # getting all the objects of hotel. Hotels = Hotel.objects.all() return render((request, 'display_hotel_images.html', {'hotel_images' : Hotels})) |
A sample html file template for displaying images.
<!DOCTYPE html> <html lang="en"> <head> <meta charset="UTF-8"> <title>Hotel Images</title> <meta name="viewport" content="width=device-width, initial-scale=1"> <link rel="stylesheet" href="https://maxcdn.bootstrapcdn.com/bootstrap/3.3.7/css/bootstrap.min.css"> <script src="https://ajax.googleapis.com/ajax/libs/jquery/3.3.1/jquery.min.js"> </script> <script src="https://maxcdn.bootstrapcdn.com/bootstrap/3.3.7/js/bootstrap.min.js"> </script> </head> <body> {% for hotel in hotel_images %} <div class="col-md-4"> {{ hotel.name }} <img src="{{ hotel.hotel_Main_Img.url }}" class="img-responsive" style="width: 100%; float: left; margin-right: 10px;" /> </div> {% endfor %} </body> </html> |
Insert the url path in the urls.py file
# urls.py
path('hotel_images', display_hotel_images, name = 'hotel_images'),
Here is the final view on the browser when we try to access the image.
######################################################
- create file upload model
class Profile(models.Model):
name = models.CharField(max_length = 50)
picture = models.FileField(upload_to = 'pictures')
#picture = models.ImageField(upload_to = 'pictures')
class Meta:
db_table = "profile"
2. create form corresponding to above model
from myapp.models import stdnt,Profile
class ProfileForm(forms.Form):
#name = forms.CharField(max_length = 100)
#picture = forms.ImageFields()
#picture = forms.FileField()
class Meta:
model = Profile
fields = ['name', 'picture']
3. Add the following entries in myapp/urls.py
path('profile/',TemplateView.as_view(template_name='profile.html')),
path('saved/',views.SaveProfile, name='saved'),
4. create myapp/views.py
from myapp.forms import ProfileForm
from myapp.models import Profile
def SaveProfile(request):
saved = False
if request.method == "POST":
#Get the posted form
MyProfileForm = ProfileForm(request.POST, request.FILES)
if MyProfileForm.is_valid():
profile = Profile()
profile.name = MyProfileForm.cleaned_data["name"]
profile.picture = MyProfileForm.cleaned_data["picture"]
profile.save()
saved = True
else:
MyProfileForm = Profileform()
return render(request, 'saved.html', locals())
5. create following html files in myapp/templates
a) profile.html
<html>
<body>
<form name = "form" enctype = "multipart/form-data"
action = "{% url "saved" %}" method = "POST" >{% csrf_token %}
<div style = "max-width:470px;">
<center>
<input type = "text" style = "margin-left:20%;"
placeholder = "Name" name = "name" />
</center>
</div>
<br>
<div style = "max-width:470px;">
<center>
<input type = "file" style = "margin-left:20%;"
placeholder = "Picture" name = "picture" />
</center>
</div>
<br>
<div style = "max-width:470px;">
<center>
<button style = "border:0px;background-color:#4285F4; margin-top:8%;
height:35px; width:80%; margin-left:19%;" type = "submit" value = "Login" >
<strong>Login</strong>
</button>
</center>
</div>
</form>
</body>
</html>
b) saved.html
<html>
<body>
{% if saved %}
<strong>Your profile was saved.</strong>
{% endif %}
{% if not saved %}
<strong>Your profile was not saved.</strong>
{% endif %}
</body>
</html>
ImageField is a FileField with uploads restricted to image formats only. Before uploading files, one needs to specify a lot of settings so that file is securely saved and can be retrieved in a convenient manner. The default form widget for this field is a ClearableFileInput. In addition to the special attributes that are available for FileField, an ImageField also has height and width attributes.
ImageField requires the Pillow library. To install the same run,
pip install Pillow
Syntax
field_name = models.ImageField(upload_to=None, height_field=None, width_field=None, max_length=100, **options)
ImageField has following optional arguments:
ImageField.upload_to
This attribute provides a way of setting the upload directory and file name, and can be set in two ways. In both cases, the value is passed to the Storage.save() method. If you specify a string value, it may contain strftime() formatting, which will be replaced by the date/time of the file upload (so that uploaded files don’t fill up the given directory). For example:
class MyModel(models.Model): # file will be uploaded to MEDIA_ROOT / uploads upload = models.ImageField(upload_to ='uploads/') # or... # file will be saved to MEDIA_ROOT / uploads / 2015 / 01 / 30 upload = models.ImageField(upload_to ='uploads/% Y/% m/% d/') |
If you are using the default FileSystemStorage, the string value will be appended to your MEDIA_ROOT path to form the location on the local filesystem where uploaded files will be stored. If you are using different storage, check that storage’s documentation to see how it handles upload_to.
upload_to may also be a callable, such as a function. This will be called to obtain the upload path, including the filename. This callable must accept two arguments and return a Unix-style path (with forward slashes) to be passed along to the storage system. The two arguments are:
| Argument | Description |
|---|---|
| instance | An instance of the model where the ImageField is defined. More specifically, this is a particular instance where the current file is being attached. |
| filename | The filename that was originally given to the file. This may or may not be taken into account when determining the final destination path |
For example:
def user_directory_path(instance, filename): # file will be uploaded to MEDIA_ROOT / user_<id>/<filename> return 'user_{0}/{1}'.format(instance.user.id, filename) class MyModel(models.Model): upload = models.ImageField(upload_to = user_directory_path) |
ImageField.height_field
Name of a model field which will be auto-populated with the height of the image each time the model instance is saved.
ImageField.width_field
Name of a model field which will be auto-populated with the width of the image each time the model instance is saved.
Django Model ImageField Explanation
Illustration of ImageField using an Example. Consider a project named geeksforgeeks having an app named geeks.
Refer to the following articles to check how to create a project and an app in Django.
Enter the following code into models.py file of geeks app.
from django.db import modelsfrom django.db.models import Model# Create your models here. class GeeksModel(Model): geeks_field = models.ImageField() |
Add the geeks app to INSTALLED_APPS
# Application definition INSTALLED_APPS = [ 'django.contrib.admin', 'django.contrib.auth', 'django.contrib.contenttypes', 'django.contrib.sessions', 'django.contrib.messages', 'django.contrib.staticfiles', 'geeks',] |
Now when we run makemigrations command from the terminal,
Python manage.py makemigrations
A new folder named migrations would be created in geeks directory with a file named 0001_initial.py
# Generated by Django 2.2.5 on 2019-09-25 06:00 from django.db import migrations, models class Migration(migrations.Migration): initial = True dependencies = [ ] operations = [ migrations.CreateModel( name ='GeeksModel', fields =[ ('id', models.AutoField( auto_created = True, primary_key = True, serialize = False, verbose_name ='ID' )), ('geeks_field', models.ImageField()), ], ), ] |
Now run,
Python manage.py migrate
Thus, an geeks_field ImageField is created when you run migrations on the project. It is a field to store valid image files.
How to use ImageField ?
ImageField is used for storing valid image files into the database. One can any type of image file in ImageField. Let’s try storing an image in the model created above.
- To start creating instances of model, create an admin account by using the following command.
Python manage.py createsuperuser
- Enter a username, email and a secure password. Then in your browser enter the following URL.
http://localhost:8000/admin/

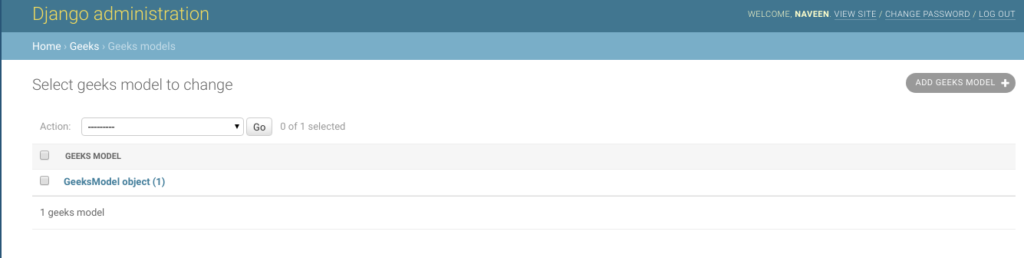
- Go to add in front of Geeks Models.

- Choose the file you want to upload and click on save. Now let’s check it in admin server. We have created an instance of GeeksModel.
Field Options
Field Options are the arguments given to each field for applying some constraint or imparting a particular characteristic to a particular Field. For example, adding an argument null = True to ImageField will enable it to store empty values for that table in relational database.
Here are the field options and attributes that an ImageField can use.
| Field Options | Description |
|---|---|
| Null | If True, Django will store empty values as NULL in the database. Default is False. |
| Blank | If True, the field is allowed to be blank. Default is False. |
| db_column | The name of the database column to use for this field. If this isn’t given, Django will use the field’s name. |
| Default | The default value for the field. This can be a value or a callable object. If callable it will be called every time a new object is created. |
| help_text | Extra “help” text to be displayed with the form widget. It’s useful for documentation even if your field isn’t used on a form. |
| primary_key | If True, this field is the primary key for the model. |
| editable | If False, the field will not be displayed in the admin or any other ModelForm. They are also skipped during model validation. Default is True. |
| error_messages | The error_messages argument lets you override the default messages that the field will raise. Pass in a dictionary with keys matching the error messages you want to override. |
| help_text | Extra “help” text to be displayed with the form widget. It’s useful for documentation even if your field isn’t used on a form. |
| verbose_name | A human-readable name for the field. If the verbose name isn’t given, Django will automatically create it using the field’s attribute name, converting underscores to spaces. |
| validators | A list of validators to run for this field. See the validators documentation for more information. |
| Unique | If True, this field must be unique throughout the table |
FileField in Django Forms is a input field for upload of files. The default widget for this input is ClearableFileInput. It normalizes to: An UploadedFile object that wraps the file content and file name into a single object. It can validate that non-empty file data has been bound to the form. This article revolves about how to upload files with Django forms and how can you save that to the database.
Note:
- When Django handles a file upload, the file data ends up placed in request.FILES (for more on the request object see the documentation for request and response objects).
- While working with files, make sure the HTML form tag contains
enctype="multipart/form-data"property.
Syntax
field_name = forms.FileField(**options)
Django form FileField Explanation
Illustration of FileField using an Example. Consider a project named geeksforgeeks having an app named geeks.
Refer to the following articles to check how to create a project and an app in Django.
Enter the following code into forms.py file of geeks app.
from django import forms class GeeksForm(forms.Form): name = forms.CharField() geeks_field = forms.FileField() |
Add the geeks app to INSTALLED_APPS
# Application definition INSTALLED_APPS = [ 'django.contrib.admin', 'django.contrib.auth', 'django.contrib.contenttypes', 'django.contrib.sessions', 'django.contrib.messages', 'django.contrib.staticfiles', 'geeks',] |
Now to render this form into a view we need a view and a URL mapped to that URL. Let’s create a view first in views.py of geeks app,
from django.shortcuts import renderfrom .forms import GeeksForm # Create your views here.def home_view(request): context = {} context['form'] = GeeksForm() return render( request, "home.html", context) |
Here we are importing that particular form from forms.py and creating an object of it in the view so that it can be rendered in a template.
Now, to initiate a Django form you need to create home.html where one would be designing the stuff as they like. Let’s create a form in home.html.
<form method="POST" enctype="multipart/form-data"> {% csrf_token %} {{ form.as_p }} <input type="submit" value="Submit"></form> |
Finally, a URL to map to this view in urls.py
from django.urls import path # importing views from views..pyfrom .views import home_view urlpatterns = [ path('', home_view ),] |
Let’s run the server and check what has actually happened, Run
Python manage.py runserver

Thus, an geeks_field FileField is created by replacing “_” with ” “. It is a field to input files from the user.
How to upload Files using FileField ?
FileField is used for input of files in the database. One can input Email Id, etc. Till now we have discussed how to implement FileField but how to use it in the view for performing the logical part. To perform some logic we would need to get the value entered into field into a python string instance.
FileField is different from other fields and it needs to be handled properly. As stated above, data fetched from a FileField would be stored in request.FILES object.
In views.py,
from django.shortcuts import renderfrom .forms import GeeksForm def handle_uploaded_file(f): with open('geeks / upload/'+f.name, 'wb+') as destination: for chunk in f.chunks(): destination.write(chunk) # Create your views here.def home_view(request): context = {} if request.POST: form = GeeksForm(request.POST, request.FILES) if form.is_valid(): handle_uploaded_file(request.FILES["geeks_field"]) else: form = GeeksForm() context['form'] = form return render(request, "home.html", context) |
Let’s explain what this code does, this code saves the file uploaded by the user in upload folder of geeks directory. Whenever a file is uploaded, it is saved to request.FILES object with key as name of the field. So we have created a function which handles the uploaded file, you can choose your own use for the file either saving it to database or operating on it or any other logical operation. Let’s try saving a file to the upload folder.

It has loaded successfully and file is saved in upload folder of geeks app.

Core Field Arguments
Core Field arguments are the arguments given to each field for applying some constraint or imparting a particular characteristic to a particular Field. For example, adding an argument required = False to FileField will enable it to be left blank by the user. Each Field class constructor takes at least these arguments. Some Field classes take additional, field-specific arguments, but the following should always be accepted:
| Field Options | Description |
|---|---|
| required | By default, each Field class assumes the value is required, so to make it not required you need to set required=False |
| label | The label argument lets you specify the “human-friendly” label for this field. This is used when the Field is displayed in a Form. |
| label_suffix | The label_suffix argument lets you override the form’s label_suffix on a per-field basis. |
| widget | The widget argument lets you specify a Widget class to use when rendering this Field. See Widgets for more information. |
| help_text | The help_text argument lets you specify descriptive text for this Field. If you provide help_text, it will be displayed next to the Field when the Field is rendered by one of the convenience Form methods. |
| error_messages | The error_messages argument lets you override the default messages that the field will raise. Pass in a dictionary with keys matching the error messages you want to override. |
| validators | The validators argument lets you provide a list of validation functions for this field. |
| localize | The localize argument enables the localization of form data input, as well as the rendered output. |
| disabled. | The disabled boolean argument, when set to True, disables a form field using the disabled HTML attribute so that it won’t be editable by users. |
class LabelDrop(models.Model):
rdbms_label = models.CharField(max_length = 20)
dep_label = models.CharField(max_length = 50)
farm_job = models.IntegerField()
exception_dif_file= models.FileField(upload_to ='uploads/',default=None)
logo = models.ImageField(upload_to='images/')
def __str__(self): # What to be displayed when Dreamreal.objects.all() is called
s="RDBMS Label:"+self.rdbms_label+" Dep Label:"+self.dep_label+" Farm Job:"+self.farm_job
return s
# import GeeksModel from models.py
from .models import RTI,signoff,LabelDrop,LabelStatus
# create a ModelForm
class SignoutForm(forms.ModelForm):
# specify the name of model to use
class Meta:
model = signoff
fields = "__all__"
# create a ModelForm
class LabelDropForm(forms.ModelForm):
# specify the name of model to use
class Meta:
model = LabelDrop
fields = "__all__"
from .forms import LabelDropForm
def labeldrop(request):
obj=None
# request.method: type of HTML action , GET or PUT or POST etc
if request.method == "POST":
#Get the posted form
# request.POST : gets the data from html page
print("###############")
print(request.POST)
print("###############")
obj = LabelDropForm(request.POST)
print(obj)
print("is valid?:", obj.is_valid())
print("lrg:",obj.cleaned_data)
print("dep label:",obj.cleaned_data['dep_label'])
#username = obj.data.get('username')
#Debugging
#print( MyLoginForm.errors)
# print("Login user:",username, " ",MyLoginForm.is_valid())
# MyLoginForm.clean_message()
if obj.is_valid():
#username = MyLoginForm.cleaned_data['username']
print("RDBMS label:",obj.cleaned_data['rdbms_label'])
else:
print("Validation failed")
#obj = SignoffForm()
else:
print(" no POST")
obj = LabelDropForm()
return render(request, 'signoff.html', {"form" : obj})
settings.py
STATIC_URL = '/static/'
MEADIA_ROOT=os.path.join(BASE_DIR,'media')
MEADIA_URL = '/meadia/'
Views.py
def labeldrop(request):
obj=None
# request.method: type of HTML action , GET or PUT or POST etc
if request.method == "POST":
#Get the posted form
# request.POST : gets the data from html page
print("###############")
print(request.POST)
print("###############")
obj = LabelDropForm(request.POST)
print(obj)
print("is valid?:", obj.is_valid())
print("lrg:",obj.cleaned_data)
print("dep label:",obj.cleaned_data['dep_label'])
#username = obj.data.get('username')
#Debugging
#print( MyLoginForm.errors)
# print("Login user:",username, " ",MyLoginForm.is_valid())
# MyLoginForm.clean_message()
if obj.is_valid():
#username = MyLoginForm.cleaned_data['username']
print("RDBMS label:",obj.cleaned_data['rdbms_label'])
else:
print("Validation failed")
#obj = SignoffForm()
else:
print(" no POST")
obj = LabelDropForm()
return render(request, 'loggedin.html', {"form" : obj})