
Openpyxl tutorial
In this tutorial we show how to work with Excel files in Python using openpyxl library.
Openpyxl
The openpyxl is a Python library to read and write Excel 2010 xlsx/xlsm/xltx/xltm files.
Excel xlsx
In this tutorial, we will work with xlsx files. The xlsx is a file extension for an open XML spreadsheet file format used by Microsoft Excel. The xlsm files support macros. The xls format is a proprietary binary format while xlsx is based on Office Open XML format.
$ sudo pip3 install openpyxl
We install openpyxl with the pip3 tool.
Creating a new file
In the first example, we will create a new xlsx file with openpyxl.
#!/usr/bin/python3
from openpyxl import Workbook
import time
book = Workbook()
sheet = book.active
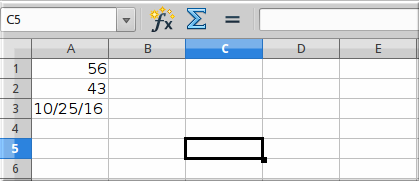
sheet['A1'] = 56
sheet['A2'] = 43
now = time.strftime("%x")
sheet['A3'] = now
book.save("sample.xlsx")
In the example, we create a new xlsx file. We write data into three cells.
from openpyxl import Workbook
From the openpyxl module, we import the Workbook class. A workbook is the container for all other parts of the document.
book = Workbook()
We create a new workbook. A workbook is always created with at least one worksheet.
sheet = book.active
We get the reference to the active sheet.
sheet['A1'] = 56
sheet['A2'] = 43
We write numerical data to cells A1 and A2.
now = time.strftime("%x")
sheet['A3'] = now
We write current date to the cell A3.
book.save("sample.xlsx")
We write the contents to the sample.xlsx file with the save() method.
Writing to a cell
There are two basic ways to write to a cell: using a key of a worksheet such as A1 or D3, or using a row and column notation with the cell() method.
#!/usr/bin/python3

from openpyxl import Workbook

book = Workbook()
sheet = book.active

sheet['A1'] = 1
sheet.cell(row=2, column=2).value = 2

book.save('write2cell.xlsx')
In the example, we write two values to two cells.
sheet['A1'] = 1
Here, we assing a numerical value to the A1 cell.
sheet.cell(row=2, column=2).value = 2
In this line, we write to cell B2 with the row and column notation.
Appending values
With the append() method, we can append a group of values at the bottom of the current sheet.
#!/usr/bin/python3

from openpyxl import Workbook

book = Workbook()
sheet = book.active

rows = (
    (88, 46, 57),
    (89, 38, 12),
    (23, 59, 78),
    (56, 21, 98),
    (24, 18, 43),
    (34, 15, 67)
)

for row in rows:
    sheet.append(row)

book.save('appending.xlsx')
In the example, we append three columns of data into the current sheet.
rows = (
    (88, 46, 57),
    (89, 38, 12),
    (23, 59, 78),
    (56, 21, 98),
    (24, 18, 43),
    (34, 15, 67)
)
The data is stored in a tuple of tuples.
for row in rows:
    sheet.append(row)
We go through the container row by row and insert the data row with the append() method.
Reading a cell
In the following example, we read the previously written data from the sample.xlsx file.
#!/usr/bin/python3

import openpyxl

book = openpyxl.load_workbook('sample.xlsx')

sheet = book.active

a1 = sheet['A1']
a2 = sheet['A2']
a3 = sheet.cell(row=3, column=1)

print(a1.value)
print(a2.value)
print(a3.value)
The example loads an existing xlsx file and reads three cells.
book = openpyxl.load_workbook('sample.xlsx')
The file is opened with the load_workbook() method.
a1 = sheet['A1']
a2 = sheet['A2']
a3 = sheet.cell(row=3, column=1)
We read the contents of the A1, A2, and A3 cells. In the third line, we use the cell() method to get the value of A3 cell.
$ ./read_cells.py
56
43
10/26/16
This is the output of the example.
Reading multiple cells
We have the following data sheet:
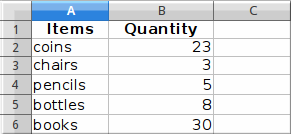
We read the data using a range operator.
#!/usr/bin/python3

import openpyxl

book = openpyxl.load_workbook('items.xlsx')

sheet = book.active

cells = sheet['A1': 'B6']

for c1, c2 in cells:
    print("{0:8} {1:8}".format(c1.value, c2.value))
In the example, we read data from two columns using a range operation.
cells = sheet['A1': 'B6']
In this line, we read data from cells A1 - B6.
for c1, c2 in cells:
    print("{0:8} {1:8}".format(c1.value, c2.value))
The format() function is used for neat output of data on the console.
$ ./read_cells2.py
Items    Quantity
coins          23
chairs          3
pencils         5
bottles         8
books          30
This is the output of the program.
########################
Online Python Tutor & Python Trainings
PythonTutor.net
Online Python Programming Tutor at Skype
• We Provide Python Programming Online Tutoring for all levels, Beginners and advanced level and for data analysis.
• We help and guide you in modules like Intro to Python, Openpyxl, Numpy, Matplotlib, Pandas, Scipy etc. We also help in Python homework Assignments.
• CS, Engineering, Social Sciences, Psychology and others aspiring to learn Python for any purpose, don't worry, You are at right place. With us you will Learn Python expertise and skills and will be second to NONE
| Home | Trainings | Join Course | Contact Us |
|---|
Python Openpyxl Tutorial: Read and Write Excel files in Python
If you have to read or write data to excel files in Python, Openpyxl is the solution for creating Excel worksheets, loading workbooks, adding copying, rename or delete a sheet, read or write to rows and columns, merge unmerge cells, Python excel charts. It also provides features for formatting and styling sheets. This tutorial also shows how to read from excel sheet and work with it. Openpyxl Engine is very helpful in Python Pandas. Hence for dealing with MS Excel files in Python, this is the most simple and practical tutorial.
Openpyxl working terminology
- An Excel file is called Workbook in Openpyxl, excel file has .xlsx extension usually
- A workbook consists of Sheets, with a minimum of one sheet and maximum of tens of sheets. Sheets are referenced by their names
- A sheet consists of Rows (horizontal series) starting from 1 and Columns (vertical series) starting from A
- Rows and Columns result in a grid and form cells which may contain some data (numerical or string value) or a formula.
- Openpyxl helps to read data from individual cell or write data to it.
Read data from an Excel file
If you want to Read, Write and Manipulate(Copy, cut, paste, delete or search for an item etc) Excel files in Python with simple and practical examples I will suggest you to see this simple and to the point Python Excel Openpyxl Course with examples about how to deal with MS Excel files in Python. This video course teaches efficiently how to manipulate excel files and automate tasks.
Everything you do in Microsoft Excel, can be automated with Python. So why not use the power of Python and make your life easy. You can make intelligent and thinking Excel sheets, bringing the power of logic and thinking of Python to Excel which is usually static, hence bringing flexibility in Excel and a number of opportunities
Here is an Ms Excel file which you are going to read with openpyxl. Create an excel file with the data on 'Sheet1' as shown in figure. Save this file in your Python Root folder and name it as "exceltest.xlsx". If you don't know where is your python root folder simply create a new folder "openpyxl" on your D: drive and save this file in that folder with name "exceltest.xlsx". In later case, full path of this file is "D:/openpyxl/exceltest.xlsx"

After creating this file and filling data in cells exactly as shown in figure now its time to read the file in Python.
Steps in reading file in Python Openpyxl:
1. Load workbook in memory and create a reference to that workbook.
2. Create a reference to sheet of the workbook you load in memory.
3. Access individual cells, first create a reference to cell and then read the data with the help of that reference.
Thats it. Simple isn't it?
Now we implement these steps.
Python Openpyxl Path Explanation:
Now open your python interpreter and write the following code
>>>import os
>>>os.getcwd()
This will result in this reply from interpreter, if python is installed on C: drive.
'C:\\Python34'
>>>
Or if you are using Pycharm, write the code in console (you can start Python Console on Pycharm by going from menu bar, Tools>Python Console) and lets suppose your Pycharm is installed on D: drive, the code will result in
'E:\\Users\\TEMP\\PycharmProjects\\openpyxlworking'
Have a screen shot of both, Python Console is like that

And for Pycharm Console it will look like this

Explanation:
>>>import os
This means we are importing Operating System module to see directories and paths. In Python when we have to use any module we have to import it to make efficient memory management.
>>>os.getcwd()
This code will show what is the current working directory ... cwd. We are asking OS to get Current working directory. os.getcwd()
When we call a function in Python we write the name of module or class and use a dot operator and write the name of function followed by parenthesis.
From the details, either your excel file should be in one of the directories
C:\\Python34
or openpyxlworking
and if you have saved it on D: drive in openpyxl folder, then you will have to give path to python for opening the file. Which is explained below.
Reading Excel file Steps:
1. Loading Workbook in Memory:
Step 1:
import openpyxl module which is to be used
>>>import openpyxl
Step 2:
Write path of your file. If the file is in your python root folder you don't have to give path just write file name and extension. If you saved file as exceltest.xlsx in openpyxl folder on D: drive the path is
>>> path="d:/openpyxl/exceltest.xlsx"
Step 3:
Load file or Workbook in to memory
If same directory then
>>>wb=openpyxl.load_workbook('exceltest.xlsx')
if saved on D:/openpyxl
>>>wb=openpyxl.load_workbook(path)
Where the path is "d:/openpyxl/exceltest.xlsx". You may write any path, depending on where your file is saved on your computer.
Step 4:
Check type of wb
>>>type(wb)
<class 'openpyxl.workbook.workbook.Workbook'>
Complete code up to step 4.

2. Accessing Sheets from Workbook:
Step 1:
If you see above mentioned code, that means workbook is successfully loaded and you have created a reference "wb" to your excel file. From onwards you will access this file with the help of this reference. Next step is to work with sheets. An excel spreadsheet has 3 Sheets by default and they are named as Sheet1, Sheet2 and Sheet3 respectively.
To get information about total number of sheets in a workbook and their names we use the function get_sheet_names()
>>>wb.get_sheet_names()
['Sheet1', 'Sheet2', 'Sheet3']Change sheet names to First, Second and Third respectively and save the file. Load the file again by running through steps 1 to 4. Call get_sheet_names function again
>>>wb.get_sheet_names()
['First', 'Second', 'Third']
Change sheet names again to Sheet1, Sheet2 and Sheet3
Step 2:
To access sheets on a workbook, you have to create reference to that particular sheet. This is just like you created reference wb to workbook. For creating reference to worksheet one of the most common functions used is get_sheet_by_name(). This function takes sheet name as an argument and creates a reference to that particular sheet which is used to access cells on the sheet and ultimately the data stored in the cells.
>>>sheet=wb.get_sheet_by_name('Sheet1')
>>>type(sheet)
<class 'openpyxl.worksheet.worksheet.Worksheet'>
Here a reference sheet is created to Sheet1 of exceltest.xlsx file. And when you check the type of reference by typing type(sheet) the interpreter tells that it is a reference to sheet. If you want to know the title of sheet referenced by sheet,
>>>sheet.title()
'Sheet1'
A workbook has one active sheet. To know about active sheet
>>>wb.active
<Worksheet "Sheet1">
A summary of creating reference to Workbook and sheet, see code in Pycharm.

3. Accessing cells and data stored in cells:
Cells in a workbook are accessed with the help of creating reference to them and value from a cell is extracted with that reference.
I will explain here three methods to read data from a cell.
The first one and very simple method is that you write the sheet reference sheet followed by square brackets with cell address written as a string in those brackets ['B4'] followed by a dot . and keyword value, see the code. The interpreter will simply write the value stored in that particular cell, B4 contains Sara in our example.
>>>sheet['B4'].value
Sara
Second method is that we create a reference to particular cell and then access the data with the help of that reference.
>>>a=sheet['B2']
>>>a.value
John
>>> type(a)
<class 'openpyxl.cell.cell.Cell'>
>>> a.row
2
>>> a.column
2
Third method which is most widely used, specially by me is accessing cells with row and column numbers. The benefit is you can iterate through whole row or column or the multidimensional grid with the help of this method very easily.
First you have to have the row and column number of cell you want to access. Then you read data with the help of creating reference to that cell.
>>>b=sheet.cell(row=3,column=4)
>>>b.value
56
>>> type(b)
<class 'openpyxl.cell.cell.Cell'>
Type shows that b is a reference to a cell. For learning purpose always check the type of reference you are creating. It will enhance your understanding how openpyxl works.
Reading and Printing a whole Row with Openpyxl:
If you want to print a whole row, key feature is that row will remain same while you iterate through column. Our exceltest file has 16 rows and 5 columns. To read and print a row a for loop is used. You can print any row with this method.
>>> for c in range(1,6):
d=sheet.cell(row=3,column=c)
print(d.value)
2
Liza
F
56
Under Grad
>>>
Row is printed but in the form of a Column. To print in a single line or row, use end=" " in print function.
>>> for c in range(1,6):
d=sheet.cell(row=3,column=c)
print(d.value + end=' ')
2 Liza F 56 Under Grad
Reading and Printing a whole Column with Openpyxl:
In the same way, when you have to print a whole column, use a for loop, keep the column same while iterate through each row with the help of for loop. To read column 2 from excel file,
>>> for r in range(1,17):
d=sheet.cell(row=r,column=2)
print(d.value)
Name
John
Liza
Sara
David
Sean
Julie
Connor
Bush
Hilton
Maya
Collin
Phil
Demy
King
Princess
Reading Rows and Columns from a sheet:
After printing rows and columns, its time to print rows and columns simultaneously with python and openpyxl. This is reading whole sheet.

Using some formating for alignment and see all data i.e. rows and columns have been read from exceltest.xlsx

Amazing isn't it?
If you want to Read, Write and Manipulate(Copy, cut, paste, delete or search for an item etc) Excel files in Python with simple and practical examples I will suggest you to see this simple and to the point Python Excel Openpyxl Course with examples about how to deal with MS Excel files in Python. This video course teaches efficiently how to manipulate excel files and automate tasks.
Everything you do in Microsoft Excel, can be automated with Python. So why not use the power of Python and make your life easy. You can make intelligent and thinking Excel sheets, bringing the power of logic and thinking of Python to Excel which is usually static, hence bringing flexibility in Excel and a number of opportunities
Now you have learned how to read from excel file with the help of Openpyxl and PythonTutor.net.
More coming soon (Professor MN, Pythontutor.net)
Non Computer Science Background Students
We Specialize in teaching and tutoring Python from intro to advanced modules like Pandas and Machine learning to Non Programming and Non computer science Python learners.
If you are not from CS We will train you that there will be no difference between your Python skills and CS programmers Python skills.
Join our Python Tutoring for first session (1-hour), Pay ONLY after if you are satisfied.Join Now
PythonTutor.net
####################
Perl | Reading Excel Files
Excel sheets are one of the most commonly used methods for maintaining office records, especially to work on applications where non-developers and even managers can provide input to the systems in batches.
However, the issue is to read the content from a file created by Microsoft Excel using Perl.
Few modules for reading from Excel files are offered by CPAN. There is Spreadsheet::Read that will be able to handle all types of spreadsheets. There are other low-level libraries reading files by different versions of Excel:
- Spreadsheet::ParseExcel Excel 95-2003 files,
- Spreadsheet::ParseXLSX Excel 2007 Open XML XLSX
Creation of an Excel File
Excel files can be created with the use of Perl by the help of an inbuilt module Excel::Writer::XLSX which is used to create Excel files.
Further, write() function is used to add content to the excel file.
Example:
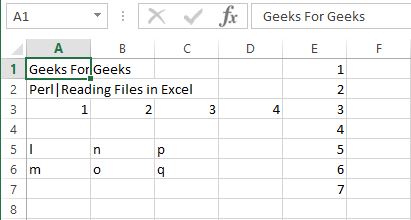
#!/usr/bin/perl use Excel::Writer::XLSX; my $Excel_book1 = Excel::Writer::XLSX->new('new_excel.xlsx' ); my $Excel_sheet1 = $Excel_book1->add_worksheet(); my @data_row = (1, 2, 3, 4); my @table_data = ( ["l", "m"], ["n", "o"], ["p", "q"], ); my @data_column = (1, 2, 3, 4, 5, 6, 7); # Using write() to write values in sheet $Excel_sheet1->write( "A1", "Geeks For Geeks" ); $Excel_sheet1->write( "A2", "Perl|Reading Files in Excel" ); $Excel_sheet1->write( "A3", \@data_row ); $Excel_sheet1->write( 4, 0, \@table_data ); $Excel_sheet1->write( 0, 4, [ \@data_column ] ); $Excel_book1->close; |
Reading from a Excel File
Reading of an Excel File in Perl is done by using Spreadsheet::Read module in a Perl script. This module exports a number of function that you either import or use in your Perl code script. ReadData() function is used to read from an excel file.
The ReadData() function accepts a filename which in this case is an Excel file, but it also accepts various other file types. Based on the file-extension, it will load the appropriate back-end module, then parses the file. It creates an array reference which represents the whole file:
Example:
use 5.016; use Spreadsheet::Read qw(ReadData); my $book_data = ReadData (‘new_excel.xlsx'); say 'A2: ' . $book_data->[1]{A2}; |
In the above code, the first element of the array which has been returned contains general information about the file. The remaining elements represent the other sheets in the file. In other words, $book_data->[1] represents the first sheet of the ‘new_excel.xlsx’. This can be used to access the content of the cells as it is a hash reference. $book_data->[1]{A2} returns a hash reference for A2 element
Output:
A2: Perl|Reading Files in Excel
Fetching Rows of an Excel File
The arguments of the function of Spreadsheet::Read are a sheet, and the number of the rows to be fetched. The return type is an array with the values of the rows passed in the argument.
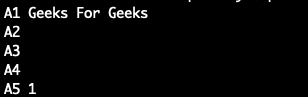
The following program demonstrates how to read the first row of the first sheet, and then displays the content in each field of the row.
my @rowsingle = Spreadsheet::Read::row($book_data->[1], 1); for my $i (0 .. $#rowsingle) { say 'A' . ($i + 1) . ' ' . ($rowsingle[$i] // ''); } |
Output:
Fetching File content
Fetching a single row is not nearly enough. We need to fetch all the rows for efficient programming. We accomplish this using the rows() function. This function takes a sheet as an argument. It returns an array of elements or array of references as a matrix(2-D array). Each element in the matrix represents a row in the spreadsheet.
The script to fetch all rows is as follows:
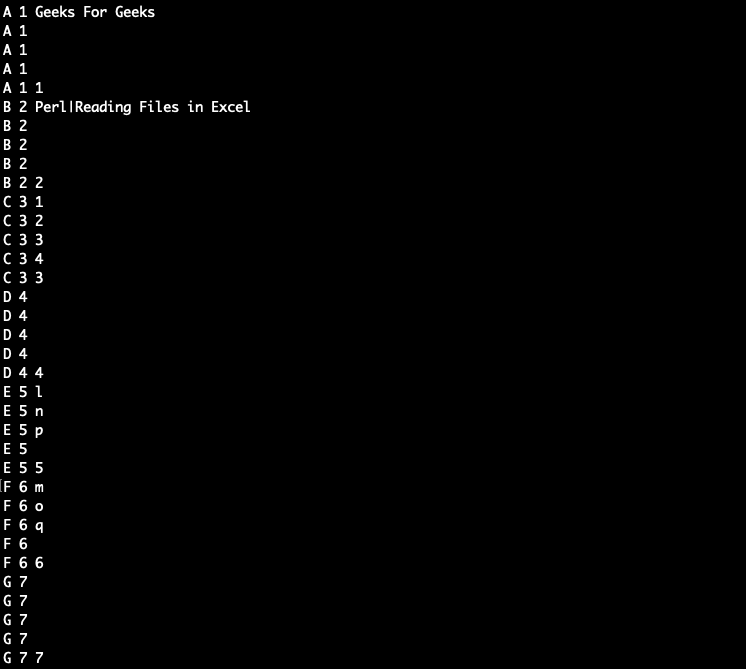
my @rowsmulti = Spreadsheet::Read::rows($book_data->[1]); foreach my $m (1 .. scalar @rowsmulti) { foreach my $n (1 .. scalar @{$rowsmulti[$m - 1]}) { say chr(64 + $m) . " $m " . ($rowsmulti[$m - 1][$n - 1] // ''); } } |
Output:
Putting it all together
Following Perl script illustrates the use of all the above explained Features of Reading an Excel File in Perl:
#!/usr/bin/perl use strict; use warnings; use 5.010; use Spreadsheet::Read qw(ReadData); my $bookdata = ReadData('simplecreate.xlsx'); say 'A1: ' . $bookdata->[1]{A1}; # Fetching a single row my @rowsingle = Spreadsheet::Read::row($bookdata->[1], 1); for my $i (0 .. $#row) { say 'A' . ($i + 1) . ' ' . ($rowsingle[$i] // ''); } # Fetching all file content my @rowsmulti = Spreadsheet::Read::rows($bookdata->[1]); foreach my $i (1 .. scalar @rowsmulti) { foreach my $j (1 .. scalar @{$rows[$i-1]}) { say chr(64 + $i) . " $j " . ($rows[$i - 1][$j - 1] // ''); } } |
OutPut:

#########
Writing to an excel sheet using Python
Using xlwt module, one can perform multiple operations on spreadsheet. For example, writing or modifying the data can be done in Python. Also, the user might have to go through various sheets and retrieve data based on some criteria or modify some rows and columns and do a lot of work.
Let’s see how to create and write to an excel-sheet using Python.
Code #1 :
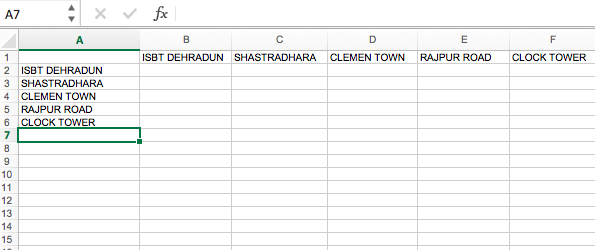
# Writing to an excel # sheet using Python import xlwt from xlwt import Workbook # Workbook is created wb = Workbook() # add_sheet is used to create sheet. sheet1 = wb.add_sheet('Sheet 1') sheet1.write(1, 0, 'ISBT DEHRADUN') sheet1.write(2, 0, 'SHASTRADHARA') sheet1.write(3, 0, 'CLEMEN TOWN') sheet1.write(4, 0, 'RAJPUR ROAD') sheet1.write(5, 0, 'CLOCK TOWER') sheet1.write(0, 1, 'ISBT DEHRADUN') sheet1.write(0, 2, 'SHASTRADHARA') sheet1.write(0, 3, 'CLEMEN TOWN') sheet1.write(0, 4, 'RAJPUR ROAD') sheet1.write(0, 5, 'CLOCK TOWER') wb.save('xlwt example.xls') |
Output :
Code #2 : Adding style sheet in excel
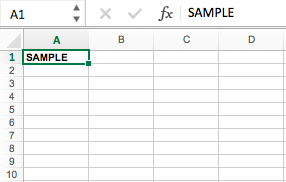
# importing xlwt module import xlwt workbook = xlwt.Workbook() sheet = workbook.add_sheet("Sheet Name") # Specifying style style = xlwt.easyxf('font: bold 1') # Specifying column sheet.write(0, 0, 'SAMPLE', style) workbook.save("sample.xls") |
Output :
Code #3 : Adding multiple styles to a cell
# importing xlwt module import xlwt workbook = xlwt.Workbook() sheet = workbook.add_sheet("Sheet Name") # Applying multiple styles style = xlwt.easyxf('font: bold 1, color red;') # Writing on specified sheet sheet.write(0, 0, 'SAMPLE', style) workbook.save("sample.xls") |
Output :

#################################################
Creating a dataframe using Excel files
Let’s see how to read excel files to Pandas dataframe objects using Pandas.
Code #1 : Read an excel file using read_excel() method of pandas.
# import pandas lib as pd import pandas as pd # read by default 1st sheet of an excel file dataframe1 = pd.read_excel('SampleWork.xlsx') print(dataframe1) |
Output :
        Name  Age    Stream  Percentage
0      Ankit   18      Math          95
1      Rahul   19   Science          90
2    Shaurya   20  Commerce          85
3  Aishwarya   18      Math          80
4   Priyanka   19   Science          75
Code #2 : Reading Specific Sheets using 'sheet_name' of read_excel() method.
# import pandas lib as pd import pandas as pd # read 2nd sheet of an excel file dataframe2 = pd.read_excel('SampleWork.xlsx', sheet_name = 1) print(dataframe2) |
Output :
       Name  Age    Stream  Percentage
0     Priya   18      Math          95
1  shivangi   19   Science          90
2      Jeet   20  Commerce          85
3    Ananya   18      Math          80
4   Swapnil   19   Science          75
Code #3 : Reading Specific Columns using 'usecols' parameter of read_excel() method.
# import pandas lib as pd import pandas as pd require_cols = [0, 3] # only read specific columns from an excel file required_df = pd.read_excel('SampleWork.xlsx', usecols = require_cols) print(required_df) |
Output :
        Name  Percentage
0      Ankit          95
1      Rahul          90
2    Shaurya          85
3  Aishwarya          80
4   Priyanka          75
Code #4 : Handling missing data using 'na_values' parameter of the read_excel() method.
# import pandas lib as pd import pandas as pd # Handling missing values of 3rd sheet of an excel file. dataframe = pd.read_excel('SampleWork.xlsx', na_values = "Missing", sheet_name = 2) print(dataframe) |
Output :
       Name  Age   Stream  Percentage
0     Priya   18     Math          95
1  shivangi   19  Science          90
2      Jeet   20      NaN          85
3    Ananya   18     Math          80
4   Swapnil   19  Science          75
Code #5 : Skip starting rows when Reading an Excel File using 'skiprows' parameter of read_excel() method.
# import pandas lib as pd import pandas as pd # read 2nd sheet of an excel file after # skipping starting two rows df = pd.read_excel('SampleWork.xlsx', sheet_name = 1, skiprows = 2) print(df) |
Output :
  shivangi  19   Science  90
0     Jeet  20  Commerce  85
1   Ananya  18      Math  80
2  Swapnil  19   Science  75
Code #6 : Set the header to any row and start reading from that row, using 'header' parameter of the read_excel() method.
# import pandas lib as pd import pandas as pd # setting the 3rd row as header. df = pd.read_excel('SampleWork.xlsx', sheet_name = 1, header = 2) print(df) |
Output :
  shivangi  19   Science  90
0     Jeet  20  Commerce  85
1   Ananya  18      Math  80
2  Swapnil  19   Science  75
Code #7 : Reading Multiple Excel Sheets using 'sheet_name' parameter of the read_excel()method.
# import pandas lib as pd import pandas as pd # read both 1st and 2nd sheet. df = pd.read_excel('SampleWork.xlsx', na_values = "Mssing", sheet_name =[0, 1]) print(df) |
Output :
OrderedDict([(0,         Name  Age    Stream  Percentage
0      Ankit   18      Math          95
1      Rahul   19   Science          90
2    Shaurya   20  Commerce          85
3  Aishwarya   18      Math          80
4   Priyanka   19   Science          75),

(1,        Name  Age    Stream  Percentage
0     Priya   18      Math          95
1  shivangi   19   Science          90
2      Jeet   20  Commerce          85
3    Ananya   18      Math          80
4   Swapnil   19   Science          75)])
Code #8 : Reading all Sheets of the excel file together using 'sheet_name' parameter of the read_excel() method.
# import pandas lib as pd import pandas as pd # read all sheets together. all_sheets_df = pd.read_excel('SampleWork.xlsx', na_values = "Missing", sheet_name = None) print(all_sheets_df) |
Output :
OrderedDict([('Sheet1',         Name  Age    Stream  Percentage
0      Ankit   18      Math          95
1      Rahul   19   Science          90
2    Shaurya   20  Commerce          85
3  Aishwarya   18      Math          80
4   Priyanka   19   Science          75),

('Sheet2',        Name  Age    Stream  Percentage
0     Priya   18      Math          95
1  shivangi   19   Science          90
2      Jeet   20  Commerce          85
3    Ananya   18      Math          80
4   Swapnil   19   Science          75),

('Sheet3',        Name  Age   Stream  Percentage
0     Priya   18     Math          95
1  shivangi   19  Science          90
2      Jeet   20      NaN          85
3    Ananya   18     Math          80
4   Swapnil   19  Science          75)])


######################################
import os
import pandas as pd
#1: Import the excel file and call it xls_file
excel_file = pd.ExcelFile('enquiries.xls')
#2. View the excel_file's sheet names
print(excel_file.sheet_names)
#3 : Read an excel file using read_excel() method of pandas.
# read by default 1st sheet of an excel file
dataframe1 = pd.read_excel('enquiries.xls')
print(dataframe1)
#4. read 2nd sheet of an excel file
#dataframe2 = pd.read_excel('enquiries.xls', sheet_name = 1)
#5 : Read an excel file using read_excel() method of pandas.
db=pd.read_excel("enquiries.xls",sheet_name="Python")
#print(db)
#6: Load the excel_file's Sheet1 as a dataframe
df = excel_file.parse('Python')
print(df)
require_cols = [2]
#7. only read specific columns from an excel file
required_df = pd.read_excel('enquiries.xls', usecols = require_cols)
print(required_df)
#8 Handling missing data using 'na_values' parameter of the read_excel() method.
dataframe = pd.read_excel('enquiries.xls', na_values = "Missing",
sheet_name = "Python")
print(dataframe)
#9 : Skip starting rows when Reading an Excel File using 'skiprows' parameter of read_excel() method.
df = pd.read_excel('enquiries.xls', sheet_name = "Python", skiprows = 2)
print(df)
#10 #6 : Set the header to any row and start reading from that row, using 'header' parameter of the read_excel() method.
# setting the 3rd row as header.
df = pd.read_excel('enquiries.xls', sheet_name = "Python", header = 2)
print(df)
#11 : Reading Multiple Excel Sheets using 'sheet_name' parameter of the read_excel()method.
# read both 1st and 2nd sheet.
df = pd.read_excel('enquiries.xls', na_values = "Mssing", sheet_name =[0, 1])
print(df)
#12 Reading all Sheets of the excel file together using 'sheet_name' parameter of the read_excel() method.
# read all sheets together.
all_sheets_df = pd.read_excel('enquiries.xls', na_values = "Missing",
sheet_name = None)
print(all_sheets_df)
##################################################