A model is a class that represents table or collection in our DB, and where every attribute of the class is a field of the table or collection. Models are defined in the app/models.py (in our example: myapp/models.py)
Creating a Model
Following is a Dreamreal model created as an example −
from django.db import models

class Dreamreal(models.Model):

   website = models.CharField(max_length = 50)
   mail = models.CharField(max_length = 50)
   name = models.CharField(max_length = 50)
   phonenumber = models.IntegerField()

   class Meta:
      db_table = "dreamreal"
Every model inherits from django.db.models.Model.
Our class has 4 attributes (3 CharField and 1 Integer), those will be the table fields.
The Meta class with the db_table attribute lets us define the actual table or collection name. Django names the table or collection automatically: myapp_modelName. This class will let you force the name of the table to what you like.
There is more field's type in django.db.models, you can learn more about them on https://docs.djangoproject.com/en/1.5/ref/models/fields/#field-types
After creating your model, you will need Django to generate the actual database −
$python manage.py syncdb
Manipulating Data (CRUD)
Let's create a "crudops" view to see how we can do CRUD operations on models. Our myapp/views.py will then look like −
myapp/views.py
from myapp.models import Dreamreal
from django.http import HttpResponse

def crudops(request):
   #Creating an entry

   dreamreal = Dreamreal(
      website = "www.polo.com", mail = "sorex@polo.com",
      name = "sorex", phonenumber = "002376970"
   )

   dreamreal.save()

   #Read ALL entries
   objects = Dreamreal.objects.all()
   res ='Printing all Dreamreal entries in the DB : <br>'

   for elt in objects:
      res += elt.name+"<br>"

   #Read a specific entry:
   sorex = Dreamreal.objects.get(name = "sorex")
   res += 'Printing One entry <br>'
   res += sorex.name

   #Delete an entry
   res += '<br> Deleting an entry <br>'
   sorex.delete()

   #Update
   dreamreal = Dreamreal(
      website = "www.polo.com", mail = "sorex@polo.com",
      name = "sorex", phonenumber = "002376970"
   )

   dreamreal.save()
   res += 'Updating entry<br>'

   dreamreal = Dreamreal.objects.get(name = 'sorex')
   dreamreal.name = 'thierry'
   dreamreal.save()

   return HttpResponse(res)
Other Data Manipulation
Let's explore other manipulations we can do on Models. Note that the CRUD operations were done on instances of our model, now we will be working directly with the class representing our model.
Let's create a 'datamanipulation' view in myapp/views.py
from myapp.models import Dreamreal
from django.http import HttpResponse

def datamanipulation(request):
   res = ''

   #Filtering data:
   qs = Dreamreal.objects.filter(name = "paul")
   res += "Found : %s results<br>"%len(qs)

   #Ordering results
   qs = Dreamreal.objects.order_by("name")

   for elt in qs:
      res += elt.name + '<br>'

   return HttpResponse(res)
Linking Models
Django ORM offers 3 ways to link models −
One of the first case we will see here is the one-to-many relationships. As you can see in the above example, Dreamreal company can have multiple online websites. Defining that relation is done by using django.db.models.ForeignKey −
myapp/models.py
from django.db import models

class Dreamreal(models.Model):
   website = models.CharField(max_length = 50)
   mail = models.CharField(max_length = 50)
   name = models.CharField(max_length = 50)
   phonenumber = models.IntegerField()
   online = models.ForeignKey('Online', default = 1)

   class Meta:
      db_table = "dreamreal"

class Online(models.Model):
      domain = models.CharField(max_length = 30)

   class Meta:
      db_table = "online"
As you can see in our updated myapp/models.py, we added the online model and linked it to our Dreamreal model.
Let's check how all of this is working via manage.py shell −
First let’s create some companies (Dreamreal entries) for testing in our Django shell −
$python manage.py shell

>>> from myapp.models import Dreamreal, Online
>>> dr1 = Dreamreal()
>>> dr1.website = 'company1.com'
>>> dr1.name = 'company1'
>>> dr1.mail = 'contact@company1'
>>> dr1.phonenumber = '12345'
>>> dr1.save()
>>> dr2 = Dreamreal()
>>> dr1.website = 'company2.com'
>>> dr2.website = 'company2.com'
>>> dr2.name = 'company2'
>>> dr2.mail = 'contact@company2'
>>> dr2.phonenumber = '56789'
>>> dr2.save()
Now some hosted domains −
>>> on1 = Online()
>>> on1.company = dr1
>>> on1.domain = "site1.com"
>>> on2 = Online()
>>> on2.company = dr1
>>> on2.domain = "site2.com"
>>> on3 = Online()
>>> on3.domain = "site3.com"
>>> dr2 = Dreamreal.objects.all()[2]
>>> on3.company = dr2
>>> on1.save()
>>> on2.save()
>>> on3.save()
Accessing attribute of the hosting company (Dreamreal entry) from an online domain is simple −
>>> on1.company.name
And if we want to know all the online domain hosted by a Company in Dreamreal we will use the code −
>>> dr1.online_set.all()
To get a QuerySet, note that all manipulating method we have seen before (filter, all, exclude, order_by....)
You can also access the linked model attributes for filtering operations, let's say you want to get all online domains where the Dreamreal name contains 'company' −
>>> Online.objects.filter(company__name__contains = 'company'
Note − That kind of query is just supported for SQL DB. It won’t work for non-relational DB where joins doesn’t exist and there are two '_'.
But that's not the only way to link models, you also have OneToOneField, a link that guarantees that the relation between two objects is unique. If we used the OneToOneField in our example above, that would mean for every Dreamreal entry only one Online entry is possible and in the other way to.
And the last one, the ManyToManyField for (n-n) relation between tables. Note, those are relevant for SQL based DB.
Django is a Python-based web framework which allows you to quickly create web application without all of the installation or dependency problems that you normally will find with other frameworks. Django is based on MVT (Model View Template) architecture and revolves around CRUD (Create, Retrieve, Update, Delete) operations. CRUD can be best explained as an approach to building a Django web application. In general CRUD means performing Create, Retrieve, Update and Delete operations on a table in a database. Let’s discuss what actually CRUD means,
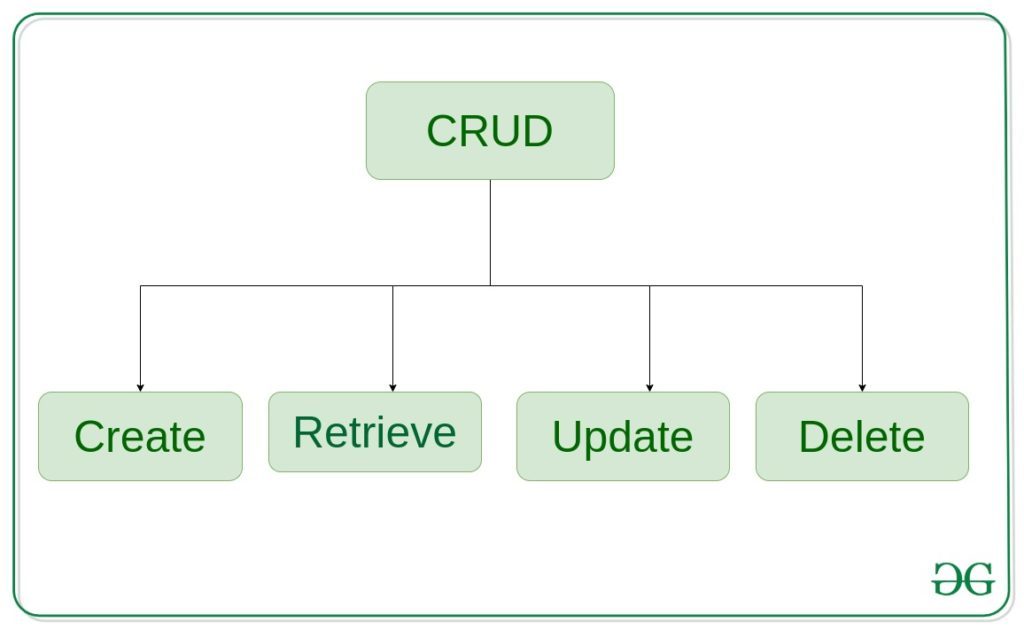
Create – create or add new entries in a table in the database.
Retrieve – read, retrieve, search, or view existing entries as a list(List View) or retrieve a particular entry in detail (Detail View)
Update – update or edit existing entries in a table in the database
Delete – delete, deactivate, or remove existing entries in a table in the database
Django CRUD (Create, Retrieve, Update, Delete) Function Based Views
Illustration of How to create and use CRUD view using an Example. Consider a project named geeksforgeeks having an app named geeks.
After you have a project and an app, let’s create a model of which we will be creating instances through our view. In geeks/models.py,
# import the standard Django Model# from built-in libraryfrom django.db import models # declare a new model with a name "GeeksModel"class GeeksModel(models.Model): # fields of the model title = models.CharField(max_length = 200) description = models.TextField() # renames the instances of the model # with their title name def __str__(self): return self.title |
After creating this model, we need to run two commands in order to create Database for the same.
Python manage.py makemigrations
Python manage.py migrate
Now we will create a Django ModelForm for this model. Refer this article for more on modelform – Django ModelForm – Create form from Models. create a file forms.py in geeks folder,
from django import formsfrom .models import GeeksModel # creating a formclass GeeksForm(forms.ModelForm): # create meta class class Meta: # specify model to be used model = GeeksModel # specify fields to be used fields = [ "title", "description", ] |
Create View
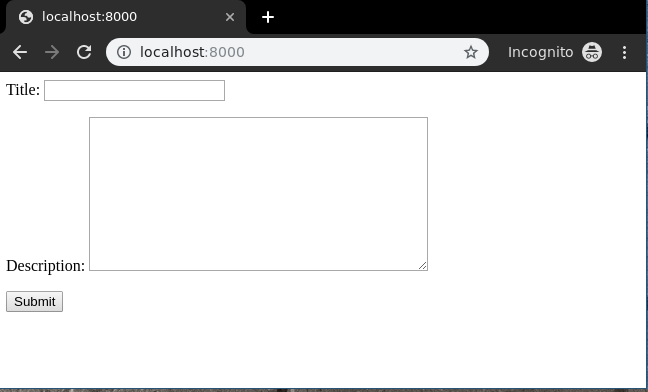
Create View refers to a view (logic) to create an instance of a table in the database. It is just like taking an input from a user and storing it in a specified table.
In geeks/views.py,
from django.shortcuts import render # relative import of formsfrom .models import GeeksModelfrom .forms import GeeksForm def create_view(request): # dictionary for initial data with # field names as keys context ={} # add the dictionary during initialization form = GeeksForm(request.POST or None) if form.is_valid(): form.save() context['form']= form return render(request, "create_view.html", context) |
Create a template in templates/create_view.html,
Now visit http://localhost:8000/
To check complete implementation of Function based Create View, visit Create View – Function based Views Django.
Retrieve View
Retrieve view is basically divided into two types of views Detail View and List View.
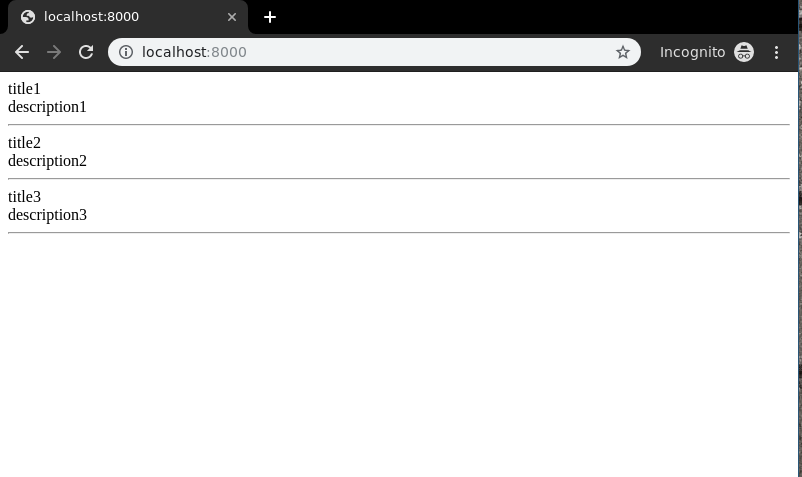
List View
List View refers to a view (logic) to list all or particular instances of a table from the database in a particular order. It is used to display multiple types of data on a single page or view, for example, products on an eCommerce page.
In geeks/views.py,
from django.shortcuts import render # relative import of formsfrom .models import GeeksModel def list_view(request): # dictionary for initial data with # field names as keys context ={} # add the dictionary during initialization context["dataset"] = GeeksModel.objects.all() return render(request, "list_view.html", context) |
Create a template in templates/list_view.html,
<div class="main"> {% for data in dataset %}. {{ data.title }}<br/> {{ data.description }}<br/> <hr/> {% endfor %} </div> |
Now visit http://localhost:8000/
To check complete implementation of Function based List View, visit List View – Function based Views Django
Detail View
Detail View refers to a view (logic) to display a particular instnace of a table from the database with all the necessary details. It is used to display multiple types of data on a single page or view, for example, profile of a user.
In geeks/views.py,
from django.urls import path # importing views from views..pyfrom .views import detail_view urlpatterns = [ path('<id>', detail_view ),] |
Let’s create a view and template for the same. In geeks/views.py,
from django.shortcuts import render # relative import of formsfrom .models import GeeksModel # pass id attribute from urlsdef detail_view(request, id): # dictionary for initial data with # field names as keys context ={} # add the dictionary during initialization context["data"] = GeeksModel.objects.get(id = id) return render(request, "detail_view.html", context) |
Create a template in templates/Detail_view.html,
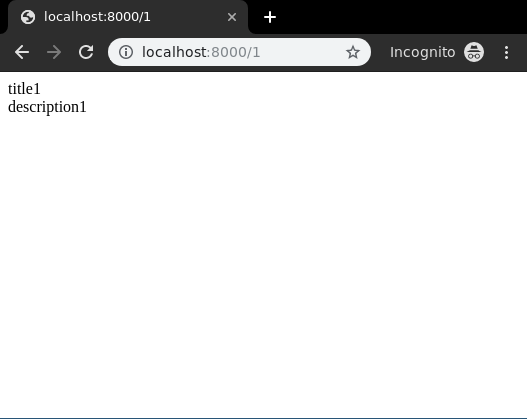
<div class="main"> <!-- Specify fields to be displayed --> {{ data.title }}<br/> {{ data.description }}<br/> </div> |
Let’s check what is there on http://localhost:8000/1
To check complete implementation of Function based Detail View, visit Detail View – Function based Views Django
Update View
Update View refers to a view (logic) to update a particular instance of a table from the database with some extra details. It is used to update enteries in the database for example, updating an article at geeksforgeeks.
In geeks/views.py,
from django.shortcuts import (get_object_or_404, render, HttpResponseRedirect) # relative import of formsfrom .models import GeeksModelfrom .forms import GeeksForm # after updating it will redirect to detail_Viewdef detail_view(request, id): # dictionary for initial data with # field names as keys context ={} # add the dictionary during initialization context["data"] = GeeksModel.objects.get(id = id) return render(request, "detail_view.html", context) # update view for detailsdef update_view(request, id): # dictionary for initial data with # field names as keys context ={} # fetch the object related to passed id obj = get_object_or_404(GeeksModel, id = id) # pass the object as instance in form form = GeeksForm(request.POST or None, instance = obj) # save the data from the form and # redirect to detail_view if form.is_valid(): form.save() return HttpResponseRedirect("/"+id) # add form dictionary to context context["form"] = form return render(request, "update_view.html", context) |
Now create following templates in templates folder,
In geeks/templates/update_view.html,
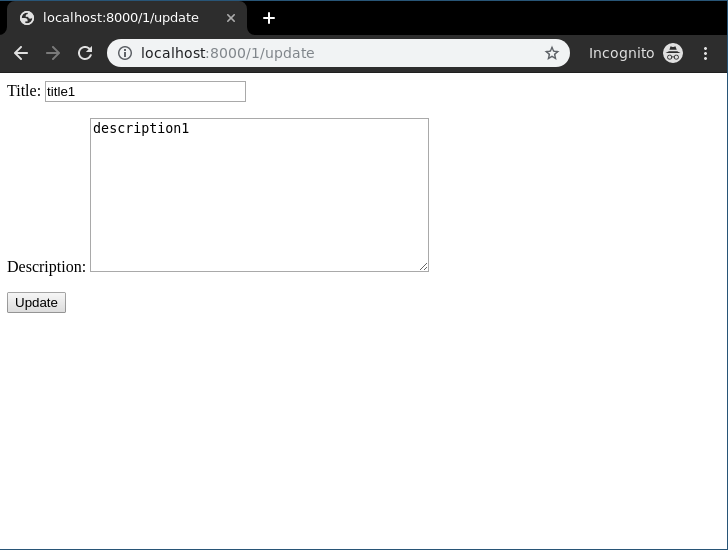
<div class="main"> <!-- Create a Form --> <form method="POST"> <!-- Security token by Django --> {% csrf_token %} <!-- form as paragraph --> {{ form.as_p }} <input type="submit" value="Update"> </form> </div> |
In geeks/templates/detail_view.html,
<div class="main"> <!-- Display attributes of instance --> {{ data.title }} <br/> {{ data.description }}</div> |
Let’s check if everything is working, visithttp://localhost:8000/1/update.
To check complete implementation of Function based update View, visit Update View – Function based Views Django
Delete View
Delete View refers to a view (logic) to delete a particular instance of a table from the database. It is used to delete entries in the database for example, deleting an article at geeksforgeeks.
In geeks/views.py
from django.shortcuts import (get_object_or_404, render, HttpResponseRedirect) from .models import GeeksModel # delete view for detailsdef delete_view(request, id): # dictionary for initial data with # field names as keys context ={} # fetch the object related to passed id obj = get_object_or_404(GeeksModel, id = id) if request.method =="POST": # delete object obj.delete() # after deleting redirect to # home page return HttpResponseRedirect("/") return render(request, "delete_view.html", context) |
Now a url mapping to this view with a regular expression of id,
In geeks/urls.py
from django.urls import path # importing views from views..pyfrom .views import delete_viewurlpatterns = [ path('<id>/delete', delete_view ),] |
Template for delete view includes a simple form confirming whether user wants to delete the instance or not. In geeks/templates/delete_view.html,
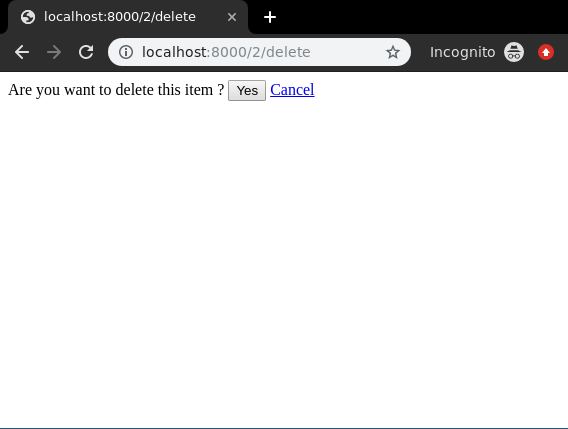
<div class="main"> <!-- Create a Form --> <form method="POST"> <!-- Security token by Django --> {% csrf_token %} Are you want to delete this item ? <input type="submit" value="Yes" /> <a href="/">Cancel </a> </form></div> |
Everything ready, now let’s check if it is working or not, visit http://localhost:8000/2/delete
To check complete implementation of Function based Delete View, visit Delete View – Function based Views Django
Attention geek! Strengthen your foundations with the Python Programming Foundation Course and learn the basics.
To begin with, your interview preparations Enhance your Data Structures concepts with the Python DS Course. And to begin with your Machine Learning Journey, join the Machine Learning – Basic Level Course
#########
##################### MODELS################
Welcome to Part 2 of the web development with Python and Django tutorial series. In this tutorial, we're going to introduce the concept of Models, which is where the majority of the value of Django comes from.
The first model we will start with is the Tutorial model, since tutorials are the main aspect of PythonProgramming.net. So, what might some attributes of a tutorial be? Obviously we've got the tutorial content, like the writeup itself. Maybe also we'd want to have the tutorial's title specifically, and then maybe the date it was published. That should be enough to start with. Later, we might come up with more things for tutorials, such as maybe what series they are a part of, or the category it falls under, and so on. As mentioned before, with Django, you can easily add more fields to your database with very little struggle, so it's not really as important as it usually is to think ahead. So, let's build the Tutorial model. Each model will be a unique class within your app's models.py file.
Let's open up models.py from main:
mysite/main/models.py
from django.db import models

# Create your models here.
We'll start by defining our Tutorial model here:
from django.db import models


class Tutorial(models.Model):
    tutorial_title = models.CharField(max_length=200)
    tutorial_content = models.TextField()
    tutorial_published = models.DateTimeField('date published')

    def __str__(self):
        return self.tutorial_title
All models will inherit from models.Model. Then, we just define our fields with ...well...fields. Note that different fields are defined in different ways. We expect our title to be fairly short, so we define this as a CharField. These fields correspond to the format of our data in the actual database. You might wonder, what's the difference between a CharField, which we use for the title, and a TextField, which we use for the content itself. In general, we use the CharField for something that does have a limit to the size, and a TextField when we don't have a limit. For all of the fields, see the django model fields documentation.
Finally, we override the the __str__ special method to make it a bit more readable when it's being displayed in string form, which we will see soon.
Okay, any time there has been a change in your models (either a new model, or you modified an existing model), you need to do a migration. There are two steps involved here. First, we run a makemigrations, then we run an actual migrate. We use the manage.py script for this, so let's get it done:
python3 manage.py makemigrations No changes detected
What?
So our migrations will only apply to apps that we've told Django we want "installed." This probably wont be the last time you add an app, build some models, attempt to migrate, and get this message. Hopefully, you wont be confused when it eventually happens to you on your own! So let's go into mysite/mysite/settings.py and add 'main.apps.MainConfig', to INSTALLED_APPS so it should look like:
mysite/mysite/settings.py
INSTALLED_APPS = [
    'main.apps.MainConfig',
    'django.contrib.admin',
    'django.contrib.auth',
    'django.contrib.contenttypes',
    'django.contrib.sessions',
    'django.contrib.messages',
    'django.contrib.staticfiles',
]
Does ...that exist? Let's check! Go open mysite/main/apps.py:
from django.apps import AppConfig


class MainConfig(AppConfig):
    name = 'main'
Yep!
Okay, let's try to make our migrations again!
python3 manage.py makemigrations
Migrations for 'main':
  main\migrations\0001_initial.py
    - Create model Tutorial
Looks good. What this step actually does is it just builds the code required for the migration, it doesn't actually apply them. If you're curious, you can see all of your migrations by going to the migrations directory of an app. For example, head to mysite/main/migrations. In there, you should see 0001_initial.py, open it up:
0001_initial.py
# Generated by Django 2.1.5 on 2019-01-11 01:35

from django.db import migrations, models


class Migration(migrations.Migration):

    initial = True

    dependencies = [
    ]

    operations = [
        migrations.CreateModel(
            name='Tutorial',
            fields=[
                ('id', models.AutoField(auto_created=True, primary_key=True, serialize=False, verbose_name='ID')),
                ('tutorial_title', models.CharField(max_length=200)),
                ('tutorial_content', models.TextField()),
                ('tutorial_published', models.DateTimeField(verbose_name='date published')),
            ],
        ),
    ]
If you know SQL, then you know that's not SQL! If you want to see the exact SQL that will be run, you can also do:
python3 manage.py sqlmigrate main 0001
BEGIN;
--
-- Create model Tutorial
--
CREATE TABLE "main_tutorial" ("id" integer NOT NULL PRIMARY KEY AUTOINCREMENT, "tutorial_title" varchar(200) NOT NULL, "tutorial_content" text NOT NULL, "tutorial_published" datetime NOT NULL);
COMMIT;
... but you probably wont be doing that. In general, you will just simple make or modify your models. Run a makemigrations and then run a migrate and you'll be done.
Cool, okay let's actually migrate then!
python3 manage.py migrate
Operations to perform:
  Apply all migrations: admin, auth, contenttypes, main, sessions
Running migrations:
  Applying contenttypes.0001_initial... OK
  Applying auth.0001_initial... OK
  Applying admin.0001_initial... OK
  Applying admin.0002_logentry_remove_auto_add... OK
  Applying admin.0003_logentry_add_action_flag_choices... OK
  Applying contenttypes.0002_remove_content_type_name... OK
  Applying auth.0002_alter_permission_name_max_length... OK
  Applying auth.0003_alter_user_email_max_length... OK
  Applying auth.0004_alter_user_username_opts... OK
  Applying auth.0005_alter_user_last_login_null... OK
  Applying auth.0006_require_contenttypes_0002... OK
  Applying auth.0007_alter_validators_add_error_messages... OK
  Applying auth.0008_alter_user_username_max_length... OK
  Applying auth.0009_alter_user_last_name_max_length... OK
  Applying main.0001_initial... OK
  Applying sessions.0001_initial... OK
Whoa, that's a lot of stuff! Remember those pending migrations from before that we saw when we ran the server? That was a bunch of them, but we can also see the one for the Tutorial model:
Applying main.0001_initial... OK
We can see that we also did some stuff for admin and auth.
Okay, so what? We can't really see what's so special about any of this. Let's add a tutorial. One quick way for us to do this at the moment is through the shell. We can access the shell through, you might be able to guess...manage.py
python3 manage.py shell
Python 3.7.2 (tags/v3.7.2:9a3ffc0492, Dec 23 2018, 23:09:28) [MSC v.1916 64 bit (AMD64)] on win32
Type "help", "copyright", "credits" or "license" for more information.
(InteractiveConsole)
This gives us a quick way to interact with our website without the need to write up some view and controller just to test something. My main use for this is to do something like test a query like a filter or a get. Once we have many related models, writing the code to properly do what we want doesn't necesaarily work the first time. Rather than printing out, logging, or displaying the data in a view, we can quickly interact via the shell. Let's see a quick example. Let's import our Tutorial model.
>>> from main.models import Tutorial
>>> Tutorial.objects.all()
<QuerySet []>
We can make a new Tutorial object from here quite easily. Recall our attributes were:
- tutorial_title
- tutorial_content
- tutorial_published
Two of those are just strings, one is a date. Let's import timezone:
>>> from django.utils import timezone
Now we can make a new Tutorial object by doing:
>>> new_tutorial = Tutorial(tutorial_title="To be", tutorial_content="or not to be.

That is the question.", tutorial_published=timezone.now())
Now all we need to do to commit this object to our database is .save()
>>> new_tutorial.save()
Now we can do:
>>> Tutorial.objects.all()
<QuerySet []>
So we get this thing called a QuerySet, which we can iterate over like:
>>> for t in Tutorial.objects.all():
...     print(t.tutorial_title)
...
To be
The shell winds up being more useful down the line, however, when we have many more objects and things are far more complex. I wouldn't actually recommend using the shell to actually insert data. Can you imagine writing an entire tutorial via the shell?! Yikes! Instead, you're much more likely to use the admin page for this, which is what we're going to be talking about in the next tutorial!
#################################
################SENT DEX #################
FOREIGN KEYS AND LINKING MODELS
##################
Welcome to part 9 of the web development with Python and Django tutorial series. In this tutorial, we're going to work on the organization of tutorials through the use of foreign keys which will allow us to tie certain elements in a database table to another database table's data.
Consider our current problem. We have some tutorials, but they're very short. Once we start adding the full length of tutorials, our home page will be nearly impossible to navigate. So then maybe we just show cards with the tutorial's title? The problem here is we still have over a thousand tutorials. Way too much!
... ok ok, why don't we order by series? Well, we still have over 50 series, which is still a lot of clutter.
So, we organize tutorials by series, and those series by category like "data analysis" or "fundamentals."
Ideally though, however, we'd just want to pick the series for a tutorial, and not need to pick both the series AND category every time, plus this would take up unnecessary database space.
Thus, what we instead do is create 2 new models: series and category. Then, tutorials will have a foreign key that point to the series they belong to, and series will point to a specific category, and this is how we have relationships between tables. Let's see how this works.
To begin, let's start by creating the TutorialCategory model.
mysite/main/models.py
class TutorialCategory(models.Model):

    tutorial_category = models.CharField(max_length=200)
    category_summary = models.CharField(max_length=200)
    category_slug = models.CharField(max_length=200, default=1)

    class Meta:
        # Gives the proper plural name for admin
        verbose_name_plural = "Categories"

    def __str__(self):
        return self.tutorial_category
The category_slug is the URL that we want to point to this category. For example if the category is "Data Analysis," then what's the URL that will point to this category, should a user click on the "Data Analysis" card.
Next, we'll make another model TutorialSeries, which will have a foreign key that points to the TutorialCategory model
class TutorialSeries(models.Model):
    tutorial_series = models.CharField(max_length=200)

    tutorial_category = models.ForeignKey(TutorialCategory, default=1, verbose_name="Category", on_delete=models.SET_DEFAULT)
    series_summary = models.CharField(max_length=200)

    class Meta:
        # otherwise we get "Tutorial Seriess in admin"
        verbose_name_plural = "Series"

    def __str__(self):
        return self.tutorial_series
The only new thing here that you may not understand is the on_delete bit. Basically, we need to know what to do with the referenced objects when the main one is deleted. When we delete a category, we don't really want to delete the tutorials from that category, nor visa versa, so instead we're opting to SET_DEFAULT here. If the category gets deleted, then the tutorials that have that category will have their categories set to their default values rather than deleted.
Now, finally, the tutorial itself:
class Tutorial(models.Model):
    tutorial_title = models.CharField(max_length=200)
    tutorial_content = models.TextField()
    tutorial_published = models.DateTimeField('date published')
    #https://docs.djangoproject.com/en/2.1/ref/models/fields/#django.db.models.ForeignKey.on_delete
    tutorial_series = models.ForeignKey(TutorialSeries, default=1, verbose_name="Series", on_delete=models.SET_DEFAULT)
    tutorial_slug = models.CharField(max_length=200, default=1)
    def __str__(self):
        return self.tutorial_title
Okay, that's a lot of changes! We've definitely changed and added models, so it's time for a makemigrations and migrate!
python manage.py makemigrations
Migrations for 'main':
  main\migrations\0005_auto_20190116_1349.py
    - Create model TutorialCategory
    - Create model TutorialSeries
    - Add field tutorial_slug to tutorial
    - Alter field tutorial_published on tutorial
    - Add field tutorial_series to tutorial
python manage.py migrate
Operations to perform:
  Apply all migrations: admin, auth, contenttypes, main, sessions
Running migrations:
  Applying main.0005_auto_20190116_1349... OK
Now that we've done all this, we also need to make modifications to our Admin page to see categories, series, and to be able to pair tutorials to series.
In mysite/main/admin.py
from .models import Tutorial, TutorialSeries, TutorialCategory
...
class TutorialAdmin(admin.ModelAdmin):

    fieldsets = [
        ("Title/date", {'fields': ["tutorial_title", "tutorial_published"]}),
        ("URL", {'fields': ["tutorial_slug"]}),
        ("Series", {'fields': ["tutorial_series"]}),
        ("Content", {"fields": ["tutorial_content"]})
    ]

    formfield_overrides = {
        models.TextField: {'widget': TinyMCE(attrs={'cols': 80, 'rows': 30})},
        }


admin.site.register(TutorialSeries)
admin.site.register(TutorialCategory)
admin.site.register(Tutorial,TutorialAdmin)
Now that we've done that, it's time to go into the admin, create 2 or 3 categories, a few tutorial series, and a few tutorials per series. You're free to just put gobbly goop (yes that's a technical term) in there, just to see how this all works. In the next tutorial, we'll start off assuming you've got a few categories, series, and tutorials per series, and show how we can go about organizing these on our website.
#################WORKING WITH FOREIGN KEYS###############
Welcome to part 10 of the web development with Django tutorial series. In this tutorial, we're going to show an example of how we can interact with our various tables linked together by foreign keys.
If you have not created your tutorials, series, and categories, I've hosted my version 9 with all of those added here: Part 9 with added tutorials, series, and categories.
On PythonProgramming.net, every series has always been contained all within "one slash." Back in the early days, files were served exactly where they sat on the server, so you organized them usually in directories. So you might have something like pythonprogramming.net/data-analysis/pandas-intro, because you had to. Nowadays, especially with a model like what we're using, we don't need this. I am not a fan of long URLs, so I opted historically to not do this and instead do pythonprogramming.net/pandas-intro.
That said, this means every single tutorial resides under ONE slash. With a framework like Django in mind, I might not have set out to do this, because it means we have to handle for this all within a single view function pretty much, other than for pages where we know the exact "slug." This will all hopefully make more sense as we go, so now I am just going to get started.
For now, I am going to refer to a case where you just have one slash example: pythonprogramming.net/data-analysis/pandas-intro as a "single" slug. At the moment, we have two cases for a "single slug:"
- Category (data analysis, fundamentals...etc)
- Specific tutorial
So, we begin filling our function with:
from .models import Tutorial, TutorialCategory, TutorialSeries
from django.http import HttpResponse

...

def single_slug(request, single_slug):
    categories = [c.category_slug for c in TutorialCategory.objects.all()]
    if single_slug in categories:
      return HttpResponse(f"{single_slug} is a category")

    tutorials = [t.tutorial_slug for t in Tutorial.objects.all()]
    if single_slug in tutorials:
      return HttpResponse(f"{single_slug} is a Tutorial")

    return HttpResponse(f"'{single_slug}' does not correspond to anything we know of!")
Next, let's go ahead and modify the homepage function as well to instead give us the categories to iterate over, rather than the tutorials:
def homepage(request):
    return render(request=request,
                  template_name='main/categories.html',
                  context={"categories": TutorialCategory.objects.all})
Finally, let's add that mysite/main/templates/categories.html:
{% extends 'main/header.html' %}

{% block content %}

    <div class="row">
        {% for cat in categories %}
            <div class="col s12 m6 l4">
                <a href="{{cat.category_slug}}", style="color:#000">
                    <div class="card hoverable">
                        <div class="card-content">
                            <div class="card-title">{{cat.tutorial_category}}</div>
                            <!--<p style="font-size:70%">Published {{tut.tutorial_published}}</p>-->
                            <p>{{cat.category_summary}}</p>
                        </div>
                    </div>
                </a>
            </div>
        {% endfor %}
    </div>
{% endblock %}
Finally, we just need to add in our controller bit in the urls.py. This is where we've unfortunately got this "single slug" every where thing going on, because we can actually have variables within our URL handling:
path("<single_slug>", views.single_slug, name="single_slug"),
With that added to our views, go ahead and refresh the homepage and you should instead see:
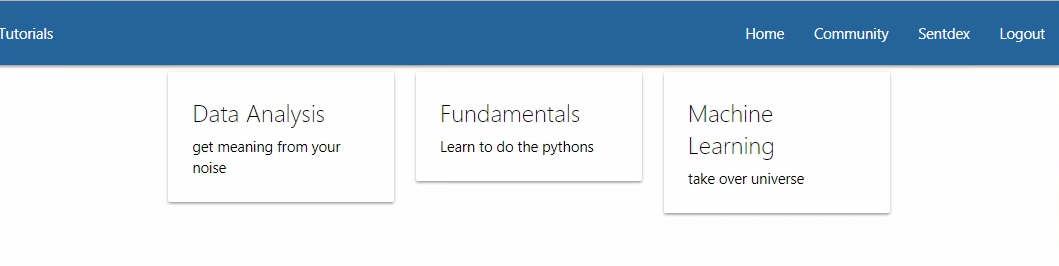
Now click on one of the categories. You should get a message like: machine-learning is a category.
Okay, let's populate this page correctly now. If it's a category, we want to display the tutorial series that fall under that category rather than just serving this message!
Once we know the category, we want to then get all of the tutorial series objects that match that category. We will do this with a filter:
matching_series = TutorialSeries.objects.filter(tutorial_category__category_slug=single_slug)
Next, when someone clicks on a tutorial series, what should happen? For now, we'd like to send them to part 1. Maybe later, we might rather have the functionality in place to send the user back to wherever they left off if they have started. Regardless, this will link to some tutorial specifically. To do this, I am going to just use a dictionary to map the series to part 1:
        for m in matching_series.all():
            part_one = Tutorial.objects.filter(tutorial_series__tutorial_series=m.tutorial_series).earliest("tutorial_published")
            series_urls[m] = part_one.tutorial_slug
Then we'd render. Full code for this views.py function now:
z
def single_slug(request, single_slug):
    # first check to see if the url is in categories.

    categories = [c.category_slug for c in TutorialCategory.objects.all()]
    if single_slug in categories:
        matching_series = TutorialSeries.objects.filter(tutorial_category__category_slug=single_slug)
        series_urls = {}

        for m in matching_series.all():
            part_one = Tutorial.objects.filter(tutorial_series__tutorial_series=m.tutorial_series).earliest("tutorial_published")
            series_urls[m] = part_one.tutorial_slug

        return render(request=request,
                      template_name='main/category.html',
                      context={"tutorial_series": matching_series, "part_ones": series_urls})
Now we need to make this category.html page:
mysite/main/templates/main/category.html
{% extends 'main/header.html' %}

{% block content %}

    <div class="row">
        {% for tut, partone in part_ones.items %}

            <div class="col s12 m6 l4">
                <a href="{{partone}}", style="color:#000">
                    <div class="card hoverable">
                        <div class="card-content">
                            <div class="card-title">{{tut.tutorial_series}}</div>
                            <!--<p style="font-size:70%">Published {{tut.tutorial_published}}</p>-->
                            <p>{{tut.series_summary}}</p>
                        </div>
                    </div>
                </a>
            </div>
        {% endfor %}
    </div>
{% endblock %}
Now, if we click on a category, we get something like:
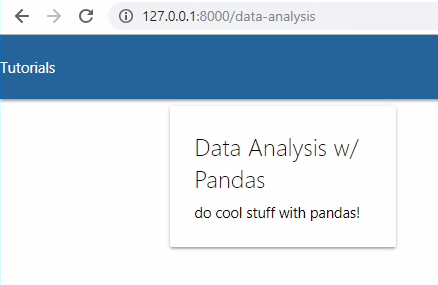
Now, if we click on a tutorial, we get a message like pandas-intro is a Tutorial.
So we need to handle for a specific tutorial, which I am going to save for the next tutorial along with the tutorial sidebar.
The most important part of a model and the only required part of a model is the list of database fields it defines. Fields are specified by class attributes. Be careful not to choose field names that conflict with the models API like clean, save, or delete.
Example:
from django.db import models

class Musician(models.Model):
    first_name = models.CharField(max_length=200)
    last_name = models.CharField(max_length=200)
    instrument = models.CharField(max_length=200)

class Album(models.Model):
    artist = models.ForeignKey(Musician, on_delete=models.CASCADE)
    name = models.CharField(max_length=100)
    release_date = models.DateField()
    num_stars = models.IntegerField()
Setting a field for storing any type of data is like deciding a data type in C/C++ for storing a particular integer, char etc. Fields in Django are the data types to store a particular type of data. For example, to store an integer, IntegerField would be used. These fields have in-built validation for a particular data type, that is you can not store “abc” in an IntegerField. Similarly, for other fields. This post revolves about major fields one can use in Django Models.
Here are some key attributes one should be aware of before starting to use Django Fields.
Field types
Each field in the model should be an instance of the appropriate Field class. Django uses field class types to determine a few things:
- The column type, which tells the database what kind of data to store (e.g. INTEGER, VARCHAR, TEXT).
- The default HTML widget to use when rendering a form field (e.g. <input type=”text”>, <select>).
- The minimal validation requirements, used in Django’s admin and in automatically-generated forms.
Django ships with dozens of built-in field types which can be used to save any type of data from number to entire HTML file too. Here is a list of all Field types used in Django.
Basic model data types and fields list
| Field Name | Description |
|---|---|
| AutoField | It An IntegerField that automatically increments. |
| BigAutoField | It is a 64-bit integer, much like an AutoField except that it is guaranteed to fit numbers from 1 to 9223372036854775807. |
| BigIntegerField | It is a 64-bit integer, much like an IntegerField except that it is guaranteed to fit numbers from -9223372036854775808 to 9223372036854775807. |
| BinaryField | A field to store raw binary data. |
| BooleanField | A true/false field. The default form widget for this field is a CheckboxInput. |
| CharField | A field to store text based values. |
| DateField | A date, represented in Python by a datetime.date instance |
| It is used for date and time, represented in Python by a datetime.datetime instance. | |
| DecimalField | It is a fixed-precision decimal number, represented in Python by a Decimal instance. |
| DurationField | A field for storing periods of time. |
| EmailField | It is a CharField that checks that the value is a valid email address. |
| FileField | It is a file-upload field. |
| FloatField | It is a floating-point number represented in Python by a float instance. |
| ImageField | It inherits all attributes and methods from FileField, but also validates that the uploaded object is a valid image. |
| IntegerField | It is an integer field. Values from -2147483648 to 2147483647 are safe in all databases supported by Django. |
| GenericIPAddressField | An IPv4 or IPv6 address, in string format (e.g. 192.0.2.30 or 2a02:42fe::4). |
| NullBooleanField | Like a BooleanField, but allows NULL as one of the options. |
| PositiveIntegerField | Like an IntegerField, but must be either positive or zero (0). |
| PositiveSmallIntegerField | Like a PositiveIntegerField, but only allows values under a certain (database-dependent) point. |
| SlugField | Slug is a newspaper term. A slug is a short label for something, containing only letters, numbers, underscores or hyphens. They’re generally used in URLs. |
| SmallIntegerField | It is like an IntegerField, but only allows values under a certain (database-dependent) point. |
| TextField | A large text field. The default form widget for this field is a Textarea. |
| TimeField | A time, represented in Python by a datetime.time instance. |
| URLField | A CharField for a URL, validated by URLValidator. |
| UUIDField | A field for storing universally unique identifiers. Uses Python’s UUID class. When used on PostgreSQL, this stores in a uuid datatype, otherwise in a char(32). |
How to use Django Field Choices ?
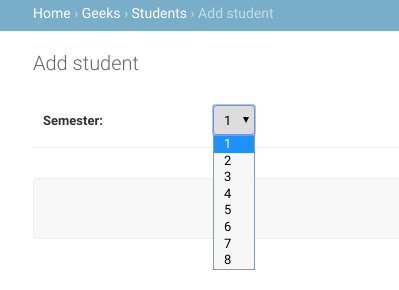
Django Field Choices. According to documentation Field Choices are a sequence consisting itself of iterables of exactly two items (e.g. [(A, B), (A, B) …]) to use as choices for some field. For example, consider a field semester which can have options as { 1, 2, 3, 4, 5, 6 } only. Choices limits the input from the user to the particular values specified in models.py. If choices are given, they’re enforced by model validation and the default form widget will be a select box with these choices instead of the standard text field. Choices can be any sequence object – not necessarily a list or tuple.
The first element in each tuple is the actual value to be set on the model, and the second element is the human-readable name.
For example,
SEMESTER_CHOICES = (
    ("1", "1"),
    ("2", "2"),
    ("3", "3"),
    ("4", "4"),
    ("5", "5"),
    ("6", "6"),
    ("7", "7"),
    ("8", "8"),
)
Let us create a choices field with above semester in our django project named geeksforgeeks.
from django.db import models # specifying choices SEMESTER_CHOICES = ( ("1", "1"), ("2", "2"), ("3", "3"), ("4", "4"), ("5", "5"), ("6", "6"), ("7", "7"), ("8", "8"),) # declaring a Student Model class Student(models.Model): semester = models.CharField( max_length = 20, choices = SEMESTER_CHOICES, default = '1' ) |
Let us check in admin panel how semester is created.
One can also collect your available choices into named groups that can be used for organizational purposes:
MEDIA_CHOICES = [
    ('Audio', (
            ('vinyl', 'Vinyl'),
            ('cd', 'CD'),
        )
    ),
    ('Video', (
            ('vhs', 'VHS Tape'),
            ('dvd', 'DVD'),
        )
    ),
    ('unknown', 'Unknown'),
]
The first element in each tuple is the name to apply to the group. The second element is an iterable of 2-tuples, with each 2-tuple containing a value and a human-readable name for an option. Grouped options may be combined with ungrouped options within a single list (such as the unknown option in this example).
Relationship Fields
Django also defines a set of fields that represent relations.
| Field Name | Description |
|---|---|
| ForeignKey | A many-to-one relationship. Requires two positional arguments: the class to which the model is related and the on_delete option. |
| ManyToManyField | A many-to-many relationship. Requires a positional argument: the class to which the model is related, which works exactly the same as it does for ForeignKey, including recursive and lazy relationships. |
| OneToOneField | A one-to-one relationship. Conceptually, this is similar to a ForeignKey with unique=True, but the “reverse” side of the relation will directly return a single object. |
Prerequisite: Django models
Django models represent real-world entities, and it is rarely the case that real-world entities are entirely independent of each other. Hence Django supports relational databases and allows us to establish relations between different models. There are three types of relational fields which Django supports: many-to-one, many-to-many and one-to-one.
Many-to-one fields:
This is used when one record of a model A is related to multiple records of another model B. For example – a model Song has many-to-one relationship with a model Album, i.e. an album can have many songs, but one song cannot be part of multiple albums. Many-to-one relations are defined using ForeignKey field of django.db.models.
Below is an example to demonstrate the same.
from django.db import modelsclass Album(models.Model):title = models.CharField(max_length = 100)artist = models.CharField(max_length = 100)class Song(models.Model):title = models.CharField(max_length = 100)album = models.ForeignKey(Album, on_delete = models.CASCADE) |
It is a good practice to name the many-to-one field with the same name as the related model, lowercase.
Many-to-many fields:
This is used when one record of a model A is related to multiple records of another model B and vice versa. For example – a model Book has many-to-many relationship with a model Author, i.e. an book can be written by multiple authors and an author can write multiple books. Many-to-many relations are defined using ManyToManyField field of django.db.models.
Below is an example to demonstrate the same.
from django.db import modelsclass Author(models.Model):name = models.CharField(max_length = 100)desc = models.TextField(max_length = 300)class Book(models.Model):title = models.CharField(max_length = 100)desc = models.TextField(max_length = 300)authors = models.ManyToManyField(Author) |
It is a good practice to name the many-to-many field with the plural version of the related model, lowercase. It doesn’t matter which of the two models contain the many-to-many field, but it shouldn’t be put in both the models.
One-to-one fields:
This is used when one record of a model A is related to exactly one record of another model B. This field can be useful as a primary key of an object if that object extends another object in some way. For example – a model Car has one-to-one relationship with a model Vehicle, i.e. a car is a vehicle. One-to-one relations are defined using OneToOneField field of django.db.models.
Below is an example to demonstrate the same.
from django.db import modelsclass Vehicle(models.Model):reg_no = models.IntegerField()owner = models.CharField(max_length = 100)class Car(models.Model):vehicle = models.OneToOneField(Vehicle, on_delete = models.CASCADE, primary_key = True)car_model = models.CharField(max_length = 100) |
It is a good practice to name the one-to-one field with the same name as that of the related model, lowercase.
Data integrity options:
Since we are creating models which depend on other models, we need to define the behavior of a record in one model when the corresponding record in the other is deleted. This is achieved by adding an optional on_delete parameter in the relational field, which can take the following values:
on_delete = models.CASCADE– This is the default value. It automatically deletes all the related records when a record is deleted.(e.g. when an Album record is deleted all the Song records related to it will be deleted)on_delete = models.PROTECT– It blocks the deletion of a record having relation with other records.(e.g. any attempt to delete an Album record will be blocked)on_delete = models.SET_NULL– It assigns NULL to the relational field when a record is deleted, providednull = Trueis set.on_delete = models.SET_DEFAULT– It assigns default values to the relational field when a record is deleted, a default value has to be provided.on_delete = models.SET()– It can either take a default value as parameter, or a callable, the return value of which will be assigned to the field.on_delete = models.DO_NOTHING– Takes no action. Its a bad practice to use this value.
This article revolves around how to add custom validation to a particular field. For example to add validation of an email to a CharField by specifying a particular format. There can be multiple ways on how to achieve custom validation. In this article, we are going to show it from the model itself so that you need not manipulate it elsewhere.
These Validation are run when you are trying to create an instance of a model. Technically, this validation is implemented after you run ModelName.objects.create(data = data).
Syntax –
field_name = models.Field(validators = [function 1, function 2])
Django Custom Field Validation Explanation
Illustration of validators using an Example. Consider a project named geeksforgeeks having an app named geeks.
Refer to the following articles to check how to create a project and an app in Django.
Enter the following code into models.py file of geeks app. We will be using CharField for experimenting for all field options.
from django.db import modelsfrom django.db.models import Model# Create your models here.class GeeksModel(Model):geeks_mail = models.CharField(max_length = 200, ) |
Now we will apply a custom validation so that the above field is validated for google mail IDs only. Create a function which accepts an argument called value. One can apply any type of operation on value now. so let us check if our function value contains @gmail.com to be validated for google mail IDs only.
from django.db import models# importing validationerrorfrom django.core.exceptions import ValidationError# creating a validator functiondef validate_geeks_mail(value):if "@gmail.com" in value:return valueelse:raise ValidationError("This field accepts mail id of google only")# Create your models here.class GeeksModel(models.Model):geeks_mail = models.CharField(max_length = 200) |
Now let us add this function as a validator in our field. Note that one validator function can be used for multiple fields simultaneously.
from django.db import models# importing validationerrorfrom django.core.exceptions import ValidationError# creating a validator functiondef validate_geeks_mail(value):if "@gmail.com" in value:return valueelse:raise ValidationError("This field accepts mail id of google only")# Create your models here.class GeeksModel(models.Model):geeks_mail = models.CharField(max_length = 200,validators =[validate_geeks_mail]) |
Let us try to create an instance without gmail.com and check if our validation worked or not. Note that after every change in models.py one needs to run makemigrations and migrate commmands.
In your browser go to http://localhost:8000/admin/geeks/geeksmodel/add/ and enter “abc@geeksforgeeks.org”.
Let us check if it gets saved in database.
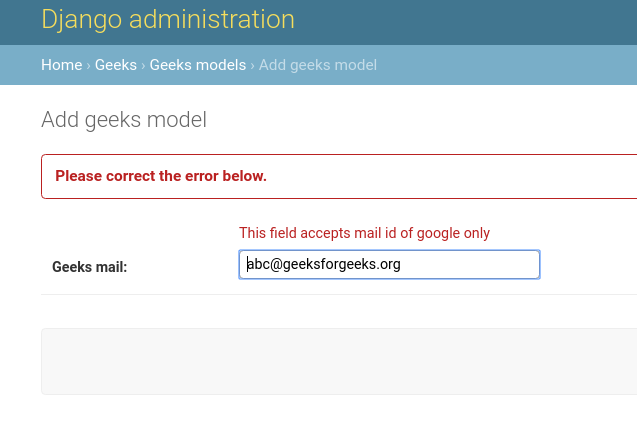
So the validation worked and this field can only accept email ids ending with @gmail.com. This way one can apply any kind of custom validation on value.
###################################
12
Cd myproject/myapp/models.py
# Create your models here.
class Dreamreal(models.Model):
name = models.CharField(max_length = 20)
mail = models.CharField(max_length = 50)
course = models.CharField(max_length = 50)
phonenumber = models.IntegerField()
online = models.ForeignKey('Online', default = 1)
def __str__(self): // What to be displayed when Dreamreal.objects.all() is called
return self.name+''+self.course
class Meta:
db_table = "dreamreal"
class Online(models.Model):
domain = models.CharField(max_length = 30)
13. python manage.py makemigrations
14. python manage.py migrate
myapp/views.py
from myapp.models import Dreamreal
def crudops(request):
#Creating an entry
#Read ALL entries
objects = Dreamreal.objects.all()
res ='Printing all Dreamreal entries in the DB : <br>'
for elt in objects:
elt.delete()
dreamreal = Dreamreal(
website = "www.polo.com", mail = "sorex@polo.com",
name = "sorex", phonenumber = "002376970"
)
dreamreal.save()
print(dreamreal)
#Read ALL entries
objects = Dreamreal.objects.all()
res ='Printing all Dreamreal entries in the DB : <br>'
for elt in objects:
res += elt.name+"<br>"
#Read a specific entry:
sorex = Dreamreal.objects.get(name = "sorex")
res += 'Printing One entry <br>'
res += sorex.name
#Delete an entry
res += '<br> Deleting an entry <br>'
sorex.delete()
#Update
dreamreal = Dreamreal(
website = "www.polo.com", mail = "sorex@polo.com",
name = "sorex", phonenumber = "002376970"
)
dreamreal.save()
res += 'Updating entry<br>'
dreamreal = Dreamreal.objects.get(name = 'sorex')
dreamreal.name = 'thierry'
dreamreal.save()
return HttpResponse(res)
myapp/urls.py
path('crud', views.crudops,name='crud'),
myapp/admin.py
from .models import Dreamreal
admin.site.register(Dreamreal)
We can add the objects of Dreamreal through admin interface.
#################
#####################################
1. Create views
myapp/models.py
from django.db import models
# Create your models here.
class Trainer(models.Model):
name = models.CharField(max_length = 20)
mail = models.CharField(max_length = 50)
course = models.CharField(max_length = 50)
ph = models.IntegerField()
student = models.ForeignKey('Student', default = 1, null=True, on_delete=models.CASCADE )
def __str__(self): # What to be displayed when Dreamreal.objects.all() is called
return self.name
class Meta:
db_table = "trainer"
class Student(models.Model):
stdnt_name = models.CharField(max_length = 20)
stdnt_mail= models.CharField(max_length = 50)
stdnt_course = models.CharField(max_length = 50)
stdnt_ph = models.IntegerField()
def __str__(self): # What to be displayed when Dreamreal.objects.all() is called
return self.stdnt_name
3. python manage.py makemigrations
4. python manage.py migrate
D:\lab\django\myproject>python manage.py shell
>>from myapp.models import Trainer,Student
>>s1=Student(stdnt_name="xyz")
>>> s1.save()
>>> t1=Trainer(name="abc")
>>> t1.save()
>>> t1.student.stdnt_name
'xyz'
>>> quit()
models.py
from django.db import models
# Create your models here.
class Student(models.Model):
name=models.CharField(max_length=20)
rollno= models.IntegerField()
course= models.CharField(max_length=20)
ph= models.IntegerField()
email=models.CharField(max_length=20)
def __str__(self):
return "name:"+self.name+" ph:"+str(self.ph)
>python manage.py shell
D:\lab\batch85\django\myproject>python manage.py shell
Python 3.8.1 (tags/v3.8.1:1b293b6, Dec 18 2019, 23:11:46) [MSC v.1916 64 bit (AMD64)] on win32
Type "help", "copyright", "credits" or "license" for more information.
(InteractiveConsole)
>>> from myapp.models import Student
>>> s=Student(name="abc",rollno=1234,course="python",ph=9987654350,email="abc@gmail.com")
>>> s.save()
>>> print(s)
name:abc ph:9987654350
>>> objs=Student.objects.all()
>>> print(objs)
<QuerySet [<Student: name:abc ph:9987654350>, <Student: name:def ph:9987683450>, <Student: name:abc ph:9987654350>, <Student: name:abc ph:9987654350>]>
>>> for s in objs:
... print(s)
...
name:abc ph:9987654350
name:def ph:9987683450
name:abc ph:9987654350
name:abc ph:9987654350
> objs=Student.objects.get(name="def")
>>> print(objs)
name:def ph:9987683450
>>> objs=Student.objects.get(name="abc")
Traceback (most recent call last):
File "<console>", line 1, in <module>
File "C:\Users\sboda.ORADEV\AppData\Local\Programs\Python\Python38\lib\site-packages\django\db\models\manager.py", line 82, in manager_method
return getattr(self.get_queryset(), name)(*args, **kwargs)
File "C:\Users\sboda.ORADEV\AppData\Local\Programs\Python\Python38\lib\site-packages\django\db\models\query.py", line 419, in get
raise self.model.MultipleObjectsReturned(
myapp.models.Student.MultipleObjectsReturned: get() returned more than one Student -- it returned 3!
>>> objs=Student.objects.get(name="def")
>>> print(objs.name)
def
>>> objs.name='xyz'
>>> objs.save()
>>> objs=Student.objects.get(name="def") # Fails with more records
Traceback (most recent call last):
File "<console>", line 1, in <module>
File "C:\Users\sboda.ORADEV\AppData\Local\Programs\Python\Python38\lib\site-packages\django\db\models\manager.py", line 82, in manager_method
return getattr(self.get_queryset(), name)(*args, **kwargs)
File "C:\Users\sboda.ORADEV\AppData\Local\Programs\Python\Python38\lib\site-packages\django\db\models\query.py", line 415, in get
raise self.model.DoesNotExist(
myapp.models.Student.DoesNotExist: Student matching query does not exist.
>>> objs=Student.objects.get(name="xyz")
>>> print(objs.name)
xyz
>>> objs=Student.objects.filter(name="abc") # more than one record , we should use filternot get
>>> print(objs)
<QuerySet [<Student: name:abc ph:9987654350>, <Student: name:abc ph:9987654350>, <Student: name:abc ph:9987654350>]>
>>> objs=Student.objects.get(name="xyz")
>>> objs.delete()
(1, {'myapp.Student': 1})
>>> objs.save()
>>> objs=Student.objects.get(name="xyz")
>>> print(objs)
name:xyz ph:9987683450
>>>